Since the girls were itty bitty, I’ve been making homemade pizza. In fact, it’s one of my fondest memories, our weekly ritual of ‘make your own’ pizzas on Friday nights. Sometimes it would be just us, but many times it would be with friends of all ages, followed by movie night. I would throw the ingredients in the bread maker, turn it on and set to prepping the fixings. When the dough dinger chimed, everyone received a wad to form for themselves, and top how they wished, choosing from the variety of toppings I put out. For us, it was the perfect way to wrap up a week, everyone elbow to elbow, creating their own personal masterpiece, watching it bake and then enjoyment of eating it. It is just a communal meal that invites conversation and relaxation. One day, I read in a cooking magazine, someone grilling their pizza and thought that was a FABULOUS idea! From then on, if the weather was cooperative, I grilled our pizza.
Then, my daughter was diagnosed gluten intolerant and that tradition came to a screeching halt.
For those unfamiliar with the challenges of GF baking, you might take for granted the marvelous qualities gluten gives to flour. It allows you to stretch and form the dough while staying intact. Depending upon the technique and recipe, it has a lovely ‘chew’, it’s texture varying from soft to crunchy. Gluten free flours have to rely upon gums like Guar and Xanthan to keep the baked goods together, and none really seem to mimic properly real gluten. I just don’t think they’ll ever have a ‘hand tossed’ Gluten Free pizza unless a genius invents an allergen free gluten. I’ve tried many different recipes and varying brands of pre-mixes, not one was a keeper. Most of these have you pat the wet dough out in a pan and pre-bake, adding the toppings after its cooked through. That isn’t a pizza in my book, and not only were some attempts like trying to chew cardboard, some had spongy texture that was unappetizing. Many couldn’t hold up to the toppings, and would get a mealy sort of soggy during the bake. It was all very discouraging, and I’d considered throwing in the towel and resigning ourselves to Dominos delivery for our pizza fix. (Note: I say considered, I would really never give up!) Then recently, a friend brought over a current issue of newer cooking magazine called “Simply Gluten Free“. I was extremely grateful for the thoughtfulness because for one, its a beautiful magazine; and secondly, it sported a cover photo of grilled pizza! I flipped to the recipe and decided to give it another try. I mean, it’s pizza, and it’s grilled, and they have a photo of the finished product, so it must have been successful. Right? That is a big ole affirmative! This was SO successful that it deserves to be shared, so here is my modified version of the recipe posted by Carol Kicinski in the July-August edition, along with photos to document our success!
Grilled Pizza Dough
(makes 8 personal sized Pizzas)
2 Cups Pamelas Bread Flour
2 tsp Xanthan Gum
1 Tbsp Active Dry Yeast
3/4 tsp sea salt
1-2 Tbsp King Arthur Flours Pizza Seasoning (Optional. This has salt in it, you can reduce the salt in the recipe if you wish, or you can add fresh or dried herbs like oregano and basil, or just leave plain) [2015 note: there are many no-salt seasonings out there now, so if salt is an issue for you, try one of those. Or, just add dried basil and oregano)
1/2 tsp pure cane sugar
2 tablespoons really high quality Extra Virgin Olive oil (plus extra to brush the cooked pizzas with)
1/2-3/4 Cup Hot Water, temperature should be right about 110 degrees
Put the dry ingredients in your stand mixer with the whisk attachment. (I know it sounds odd, but since this is not wheat flour, it works better than a dough hook or the paddle attachment) Add the olive oil and whisk in. Then, add about 1/2 cup of the hot water and mix, adding more until the dough has come together and starts to form a ball around the whisk. Its better to be able to add more water if you need (be careful, it can splash!) than to have it too wet. I found that the dough starts off crumbly, then comes together quite nicely with about 2/3 of a cup water. It will feel slightly tacky, but not dry, and not wet.
Remove and turn the ball out on a floured surface. (I used Pamelas Artisan All-Purpose flour to dust my counter) Give the dough a few good kneads to smooth it out until it’s no longer sticky. Cut the ball in to quarters, and then cut the quarters in to halves, creating 8 balls of dough. I kept mine covered with a clean tea towel while I worked, so they would not dry out.
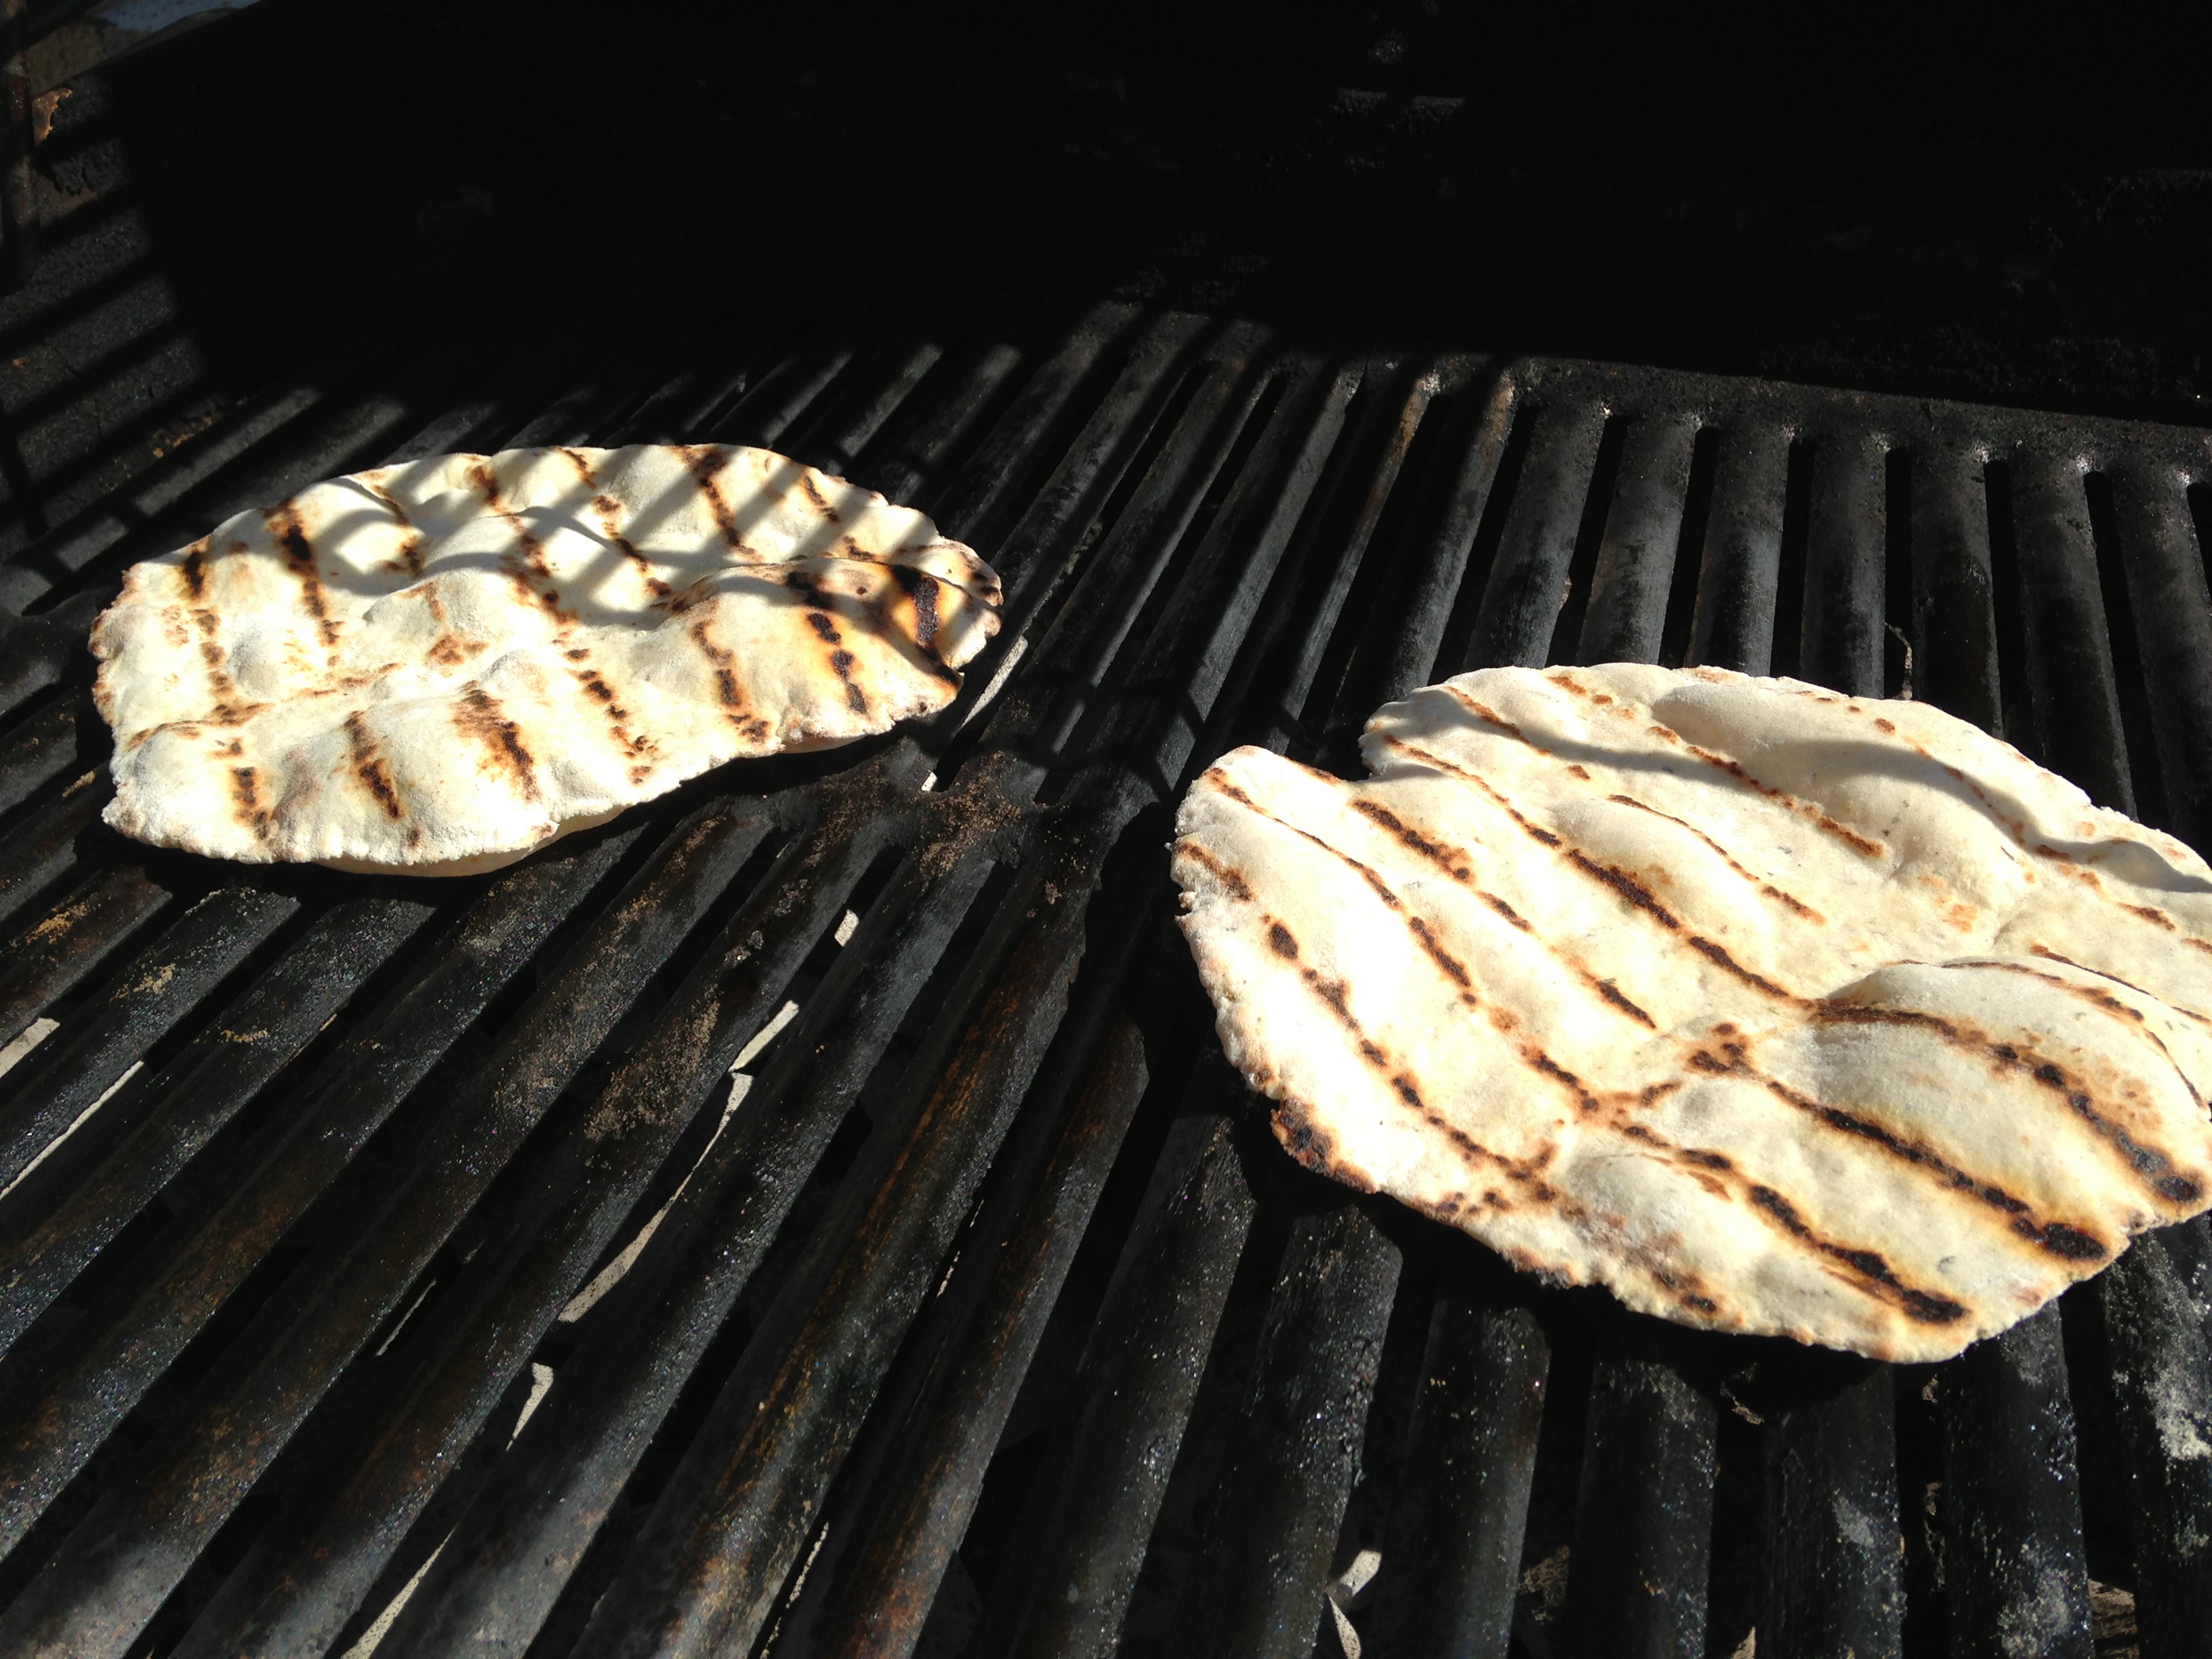
Using a rolling pin, roll the balls out in to discs that should be about 7-8 inches wide. These will be fairly thin, but if you have worked the dough correctly, they will hold together. Stack on a pan, separating the disks with parchment or wax paper. Heat your grill, and lightly oil the cooking surface.
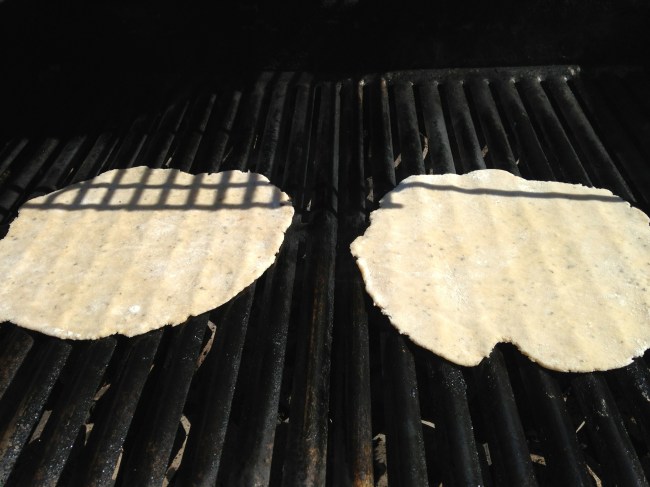
Grill the dough, flipping at about 2 minutes.
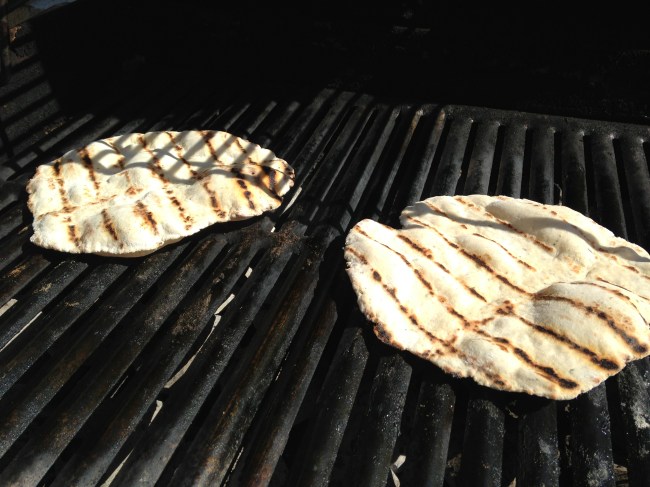
You are partially cooking them, not fully cooking. Many of mine puffed like a pita bread, no worries, it will deflate off the grill. After they are finished on the grill, very LIGHTLY brush both sides with olive oil. Be sparing with the oil, you don’t want them to be soggy.
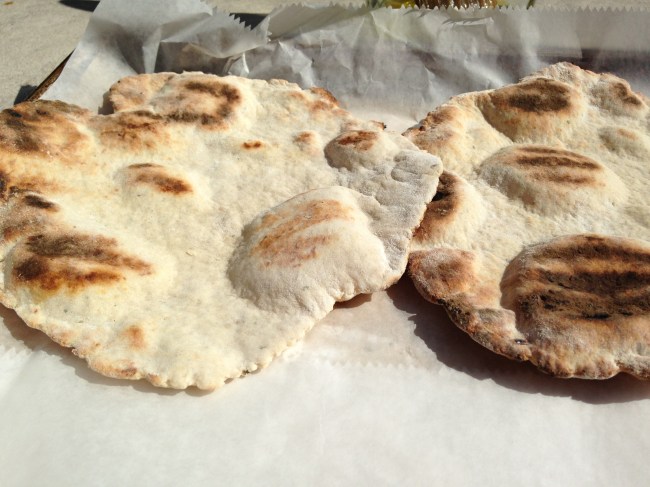
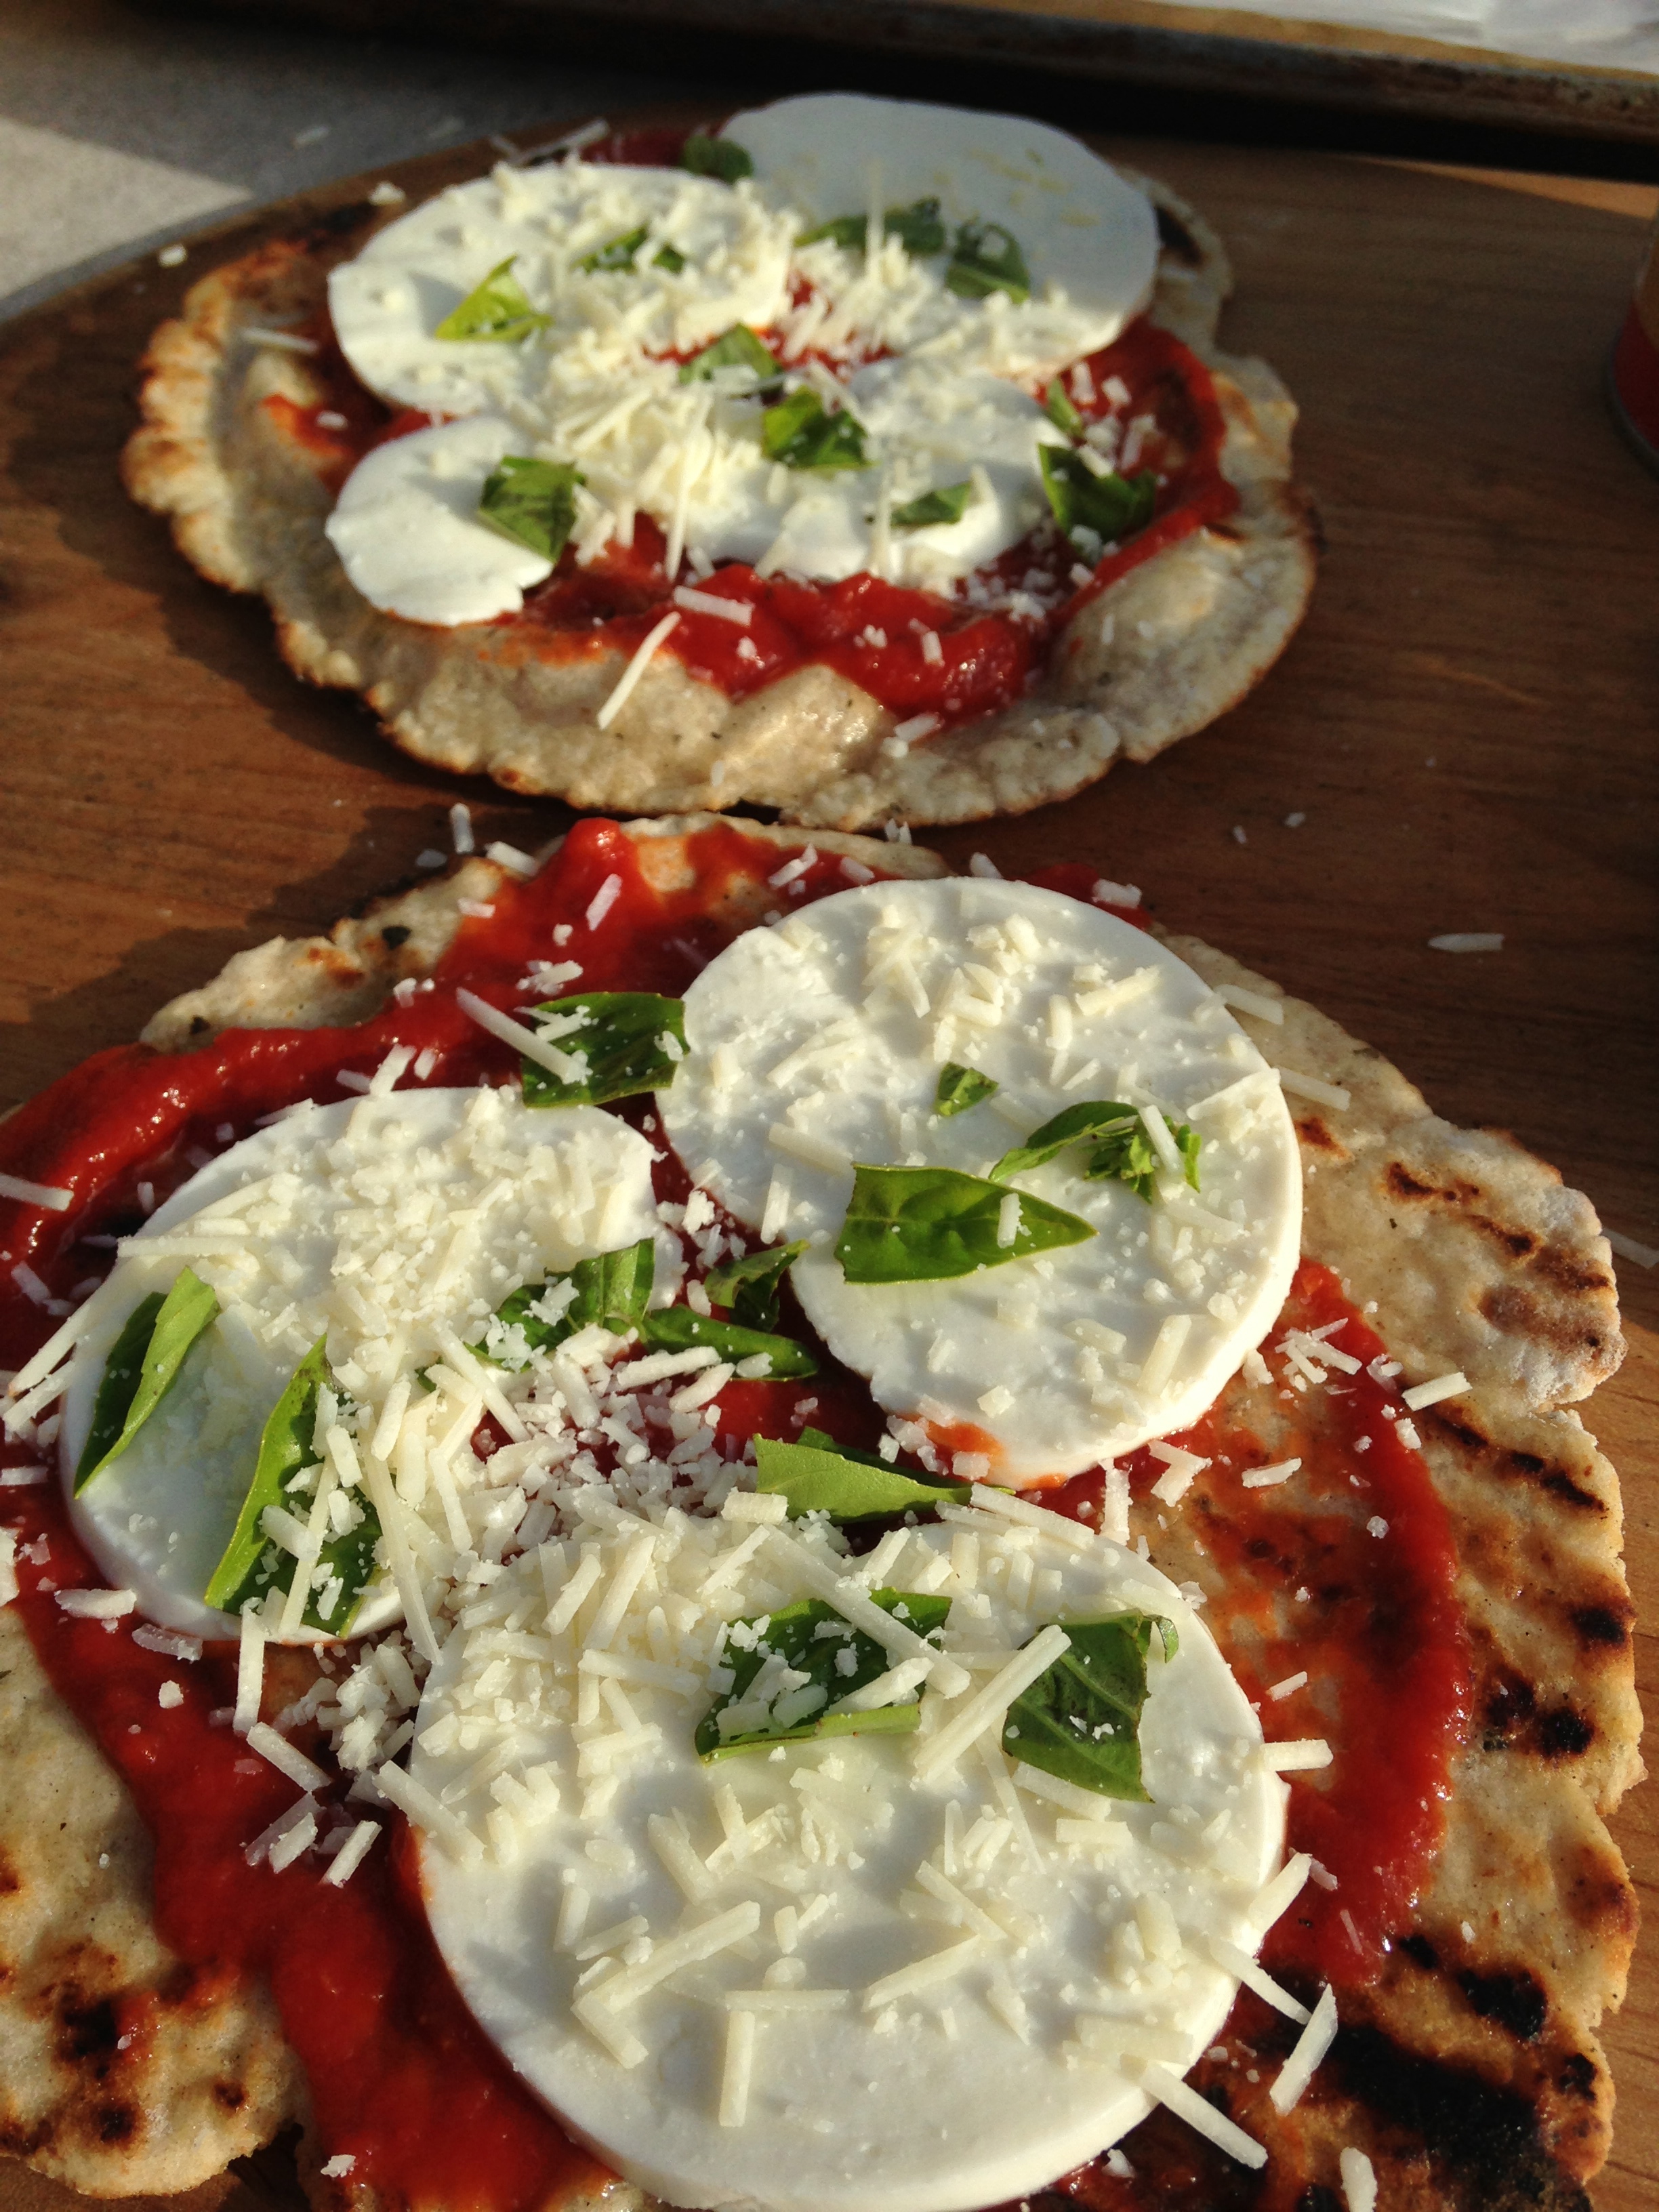
While waiting for the family to gather, you can pre-grilled these, set aside to cool, then loosely cover with a tea towel. In the meantime, I mis en place the toppings.
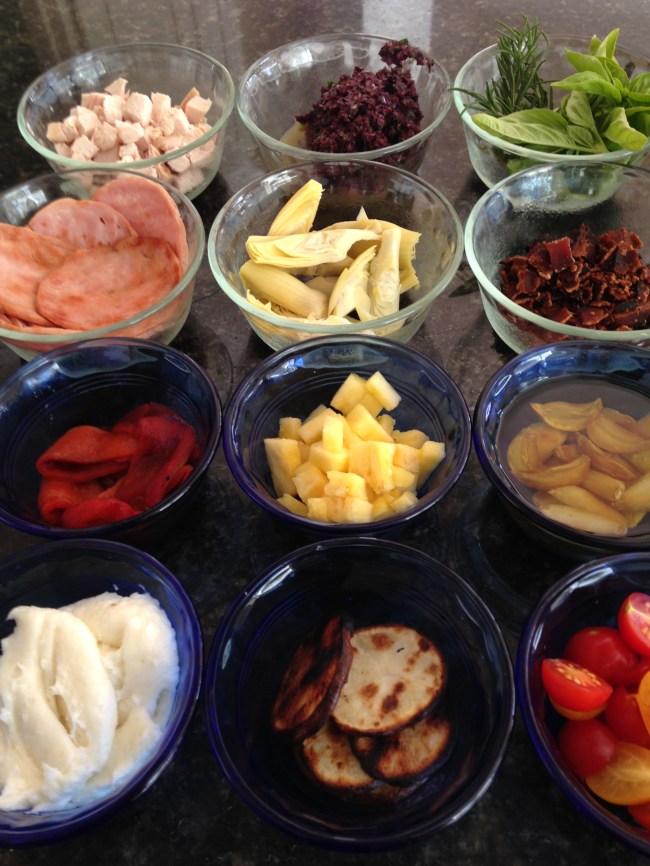
When everyone was ready, I took everything outside by the grill to let the magic happen! We created the following pizzas, which we then cut in to 4ths, allowing all of us to sample each one. Cook these over medium heat with the lid down so the bottoms won’t burn while the toppings heat up and the cheese melts. Check frequently.
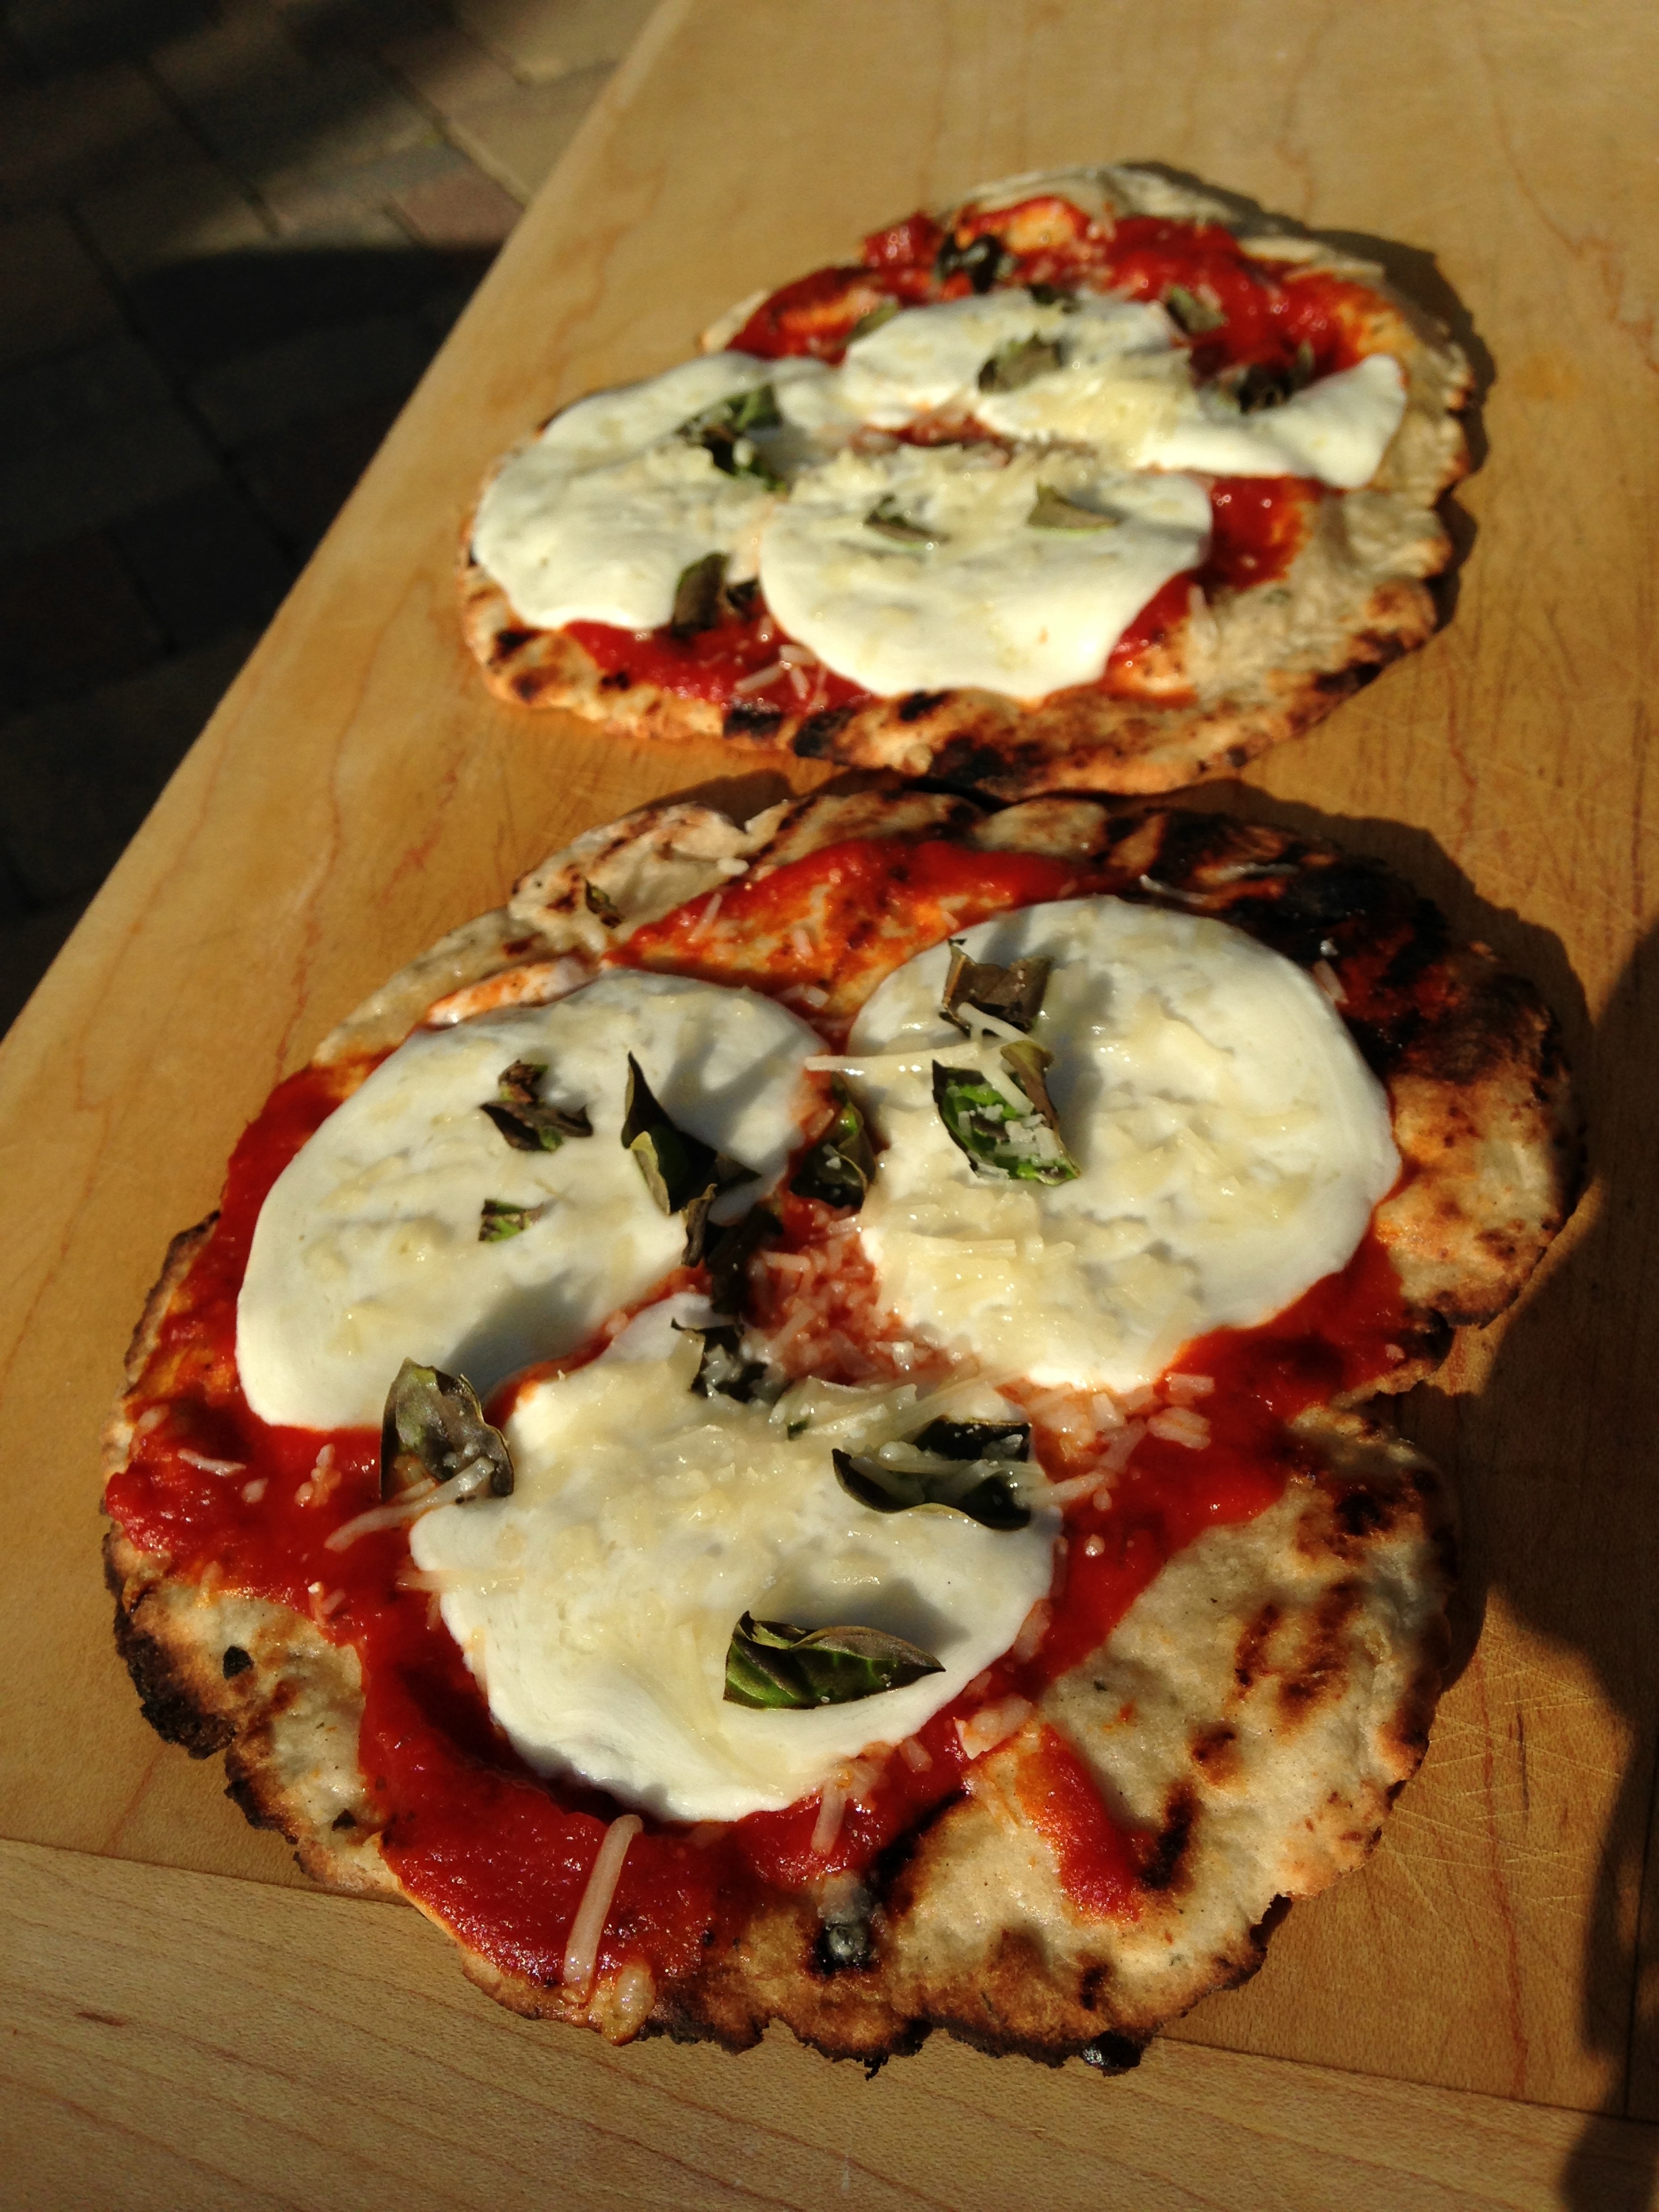
Margherita: Fresh Mozzarella, Basil and GF artisan pizza sauce, before

And after:

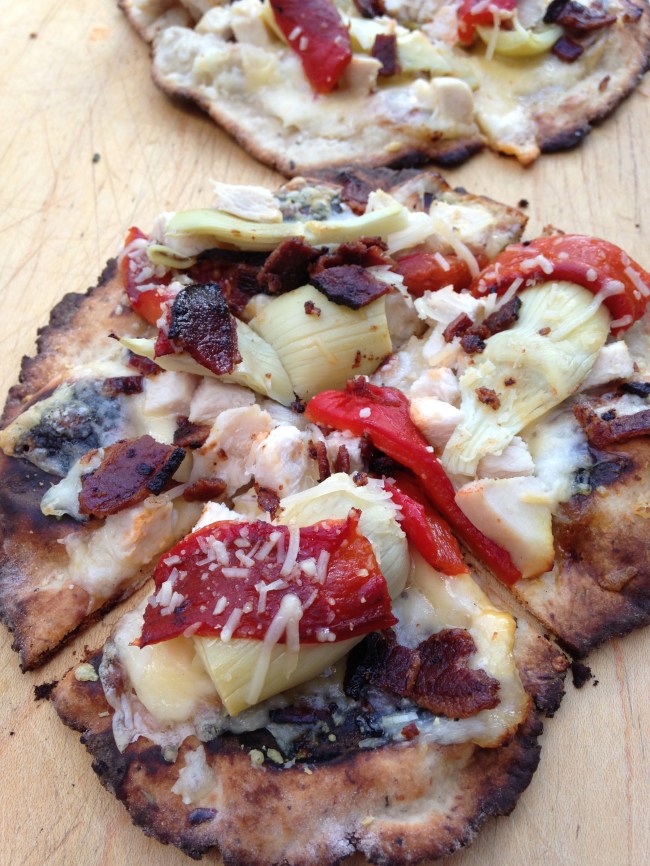
Garlicky Bacon-Chicken Artichoke with Smoked Gouda and roasted bell peppers:
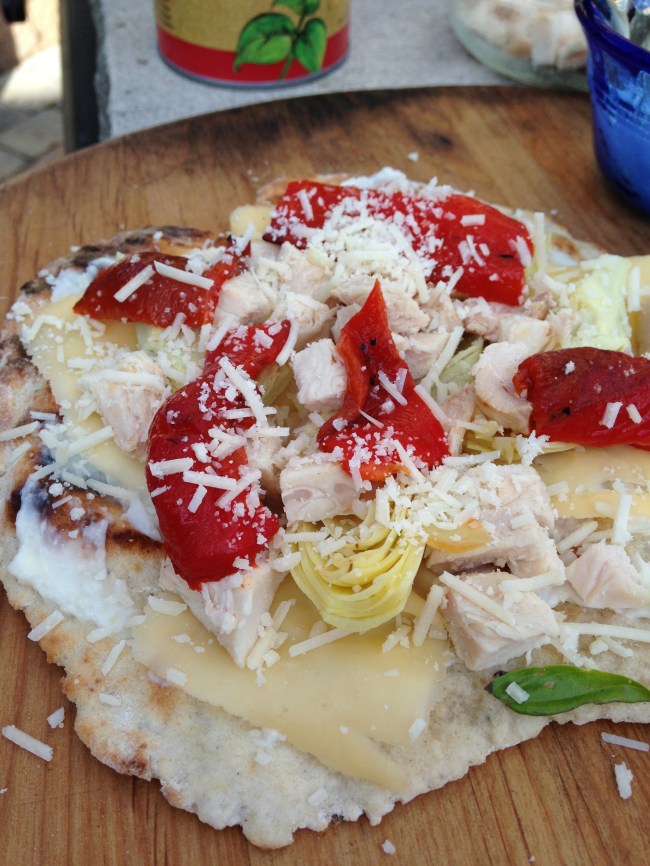
And after:
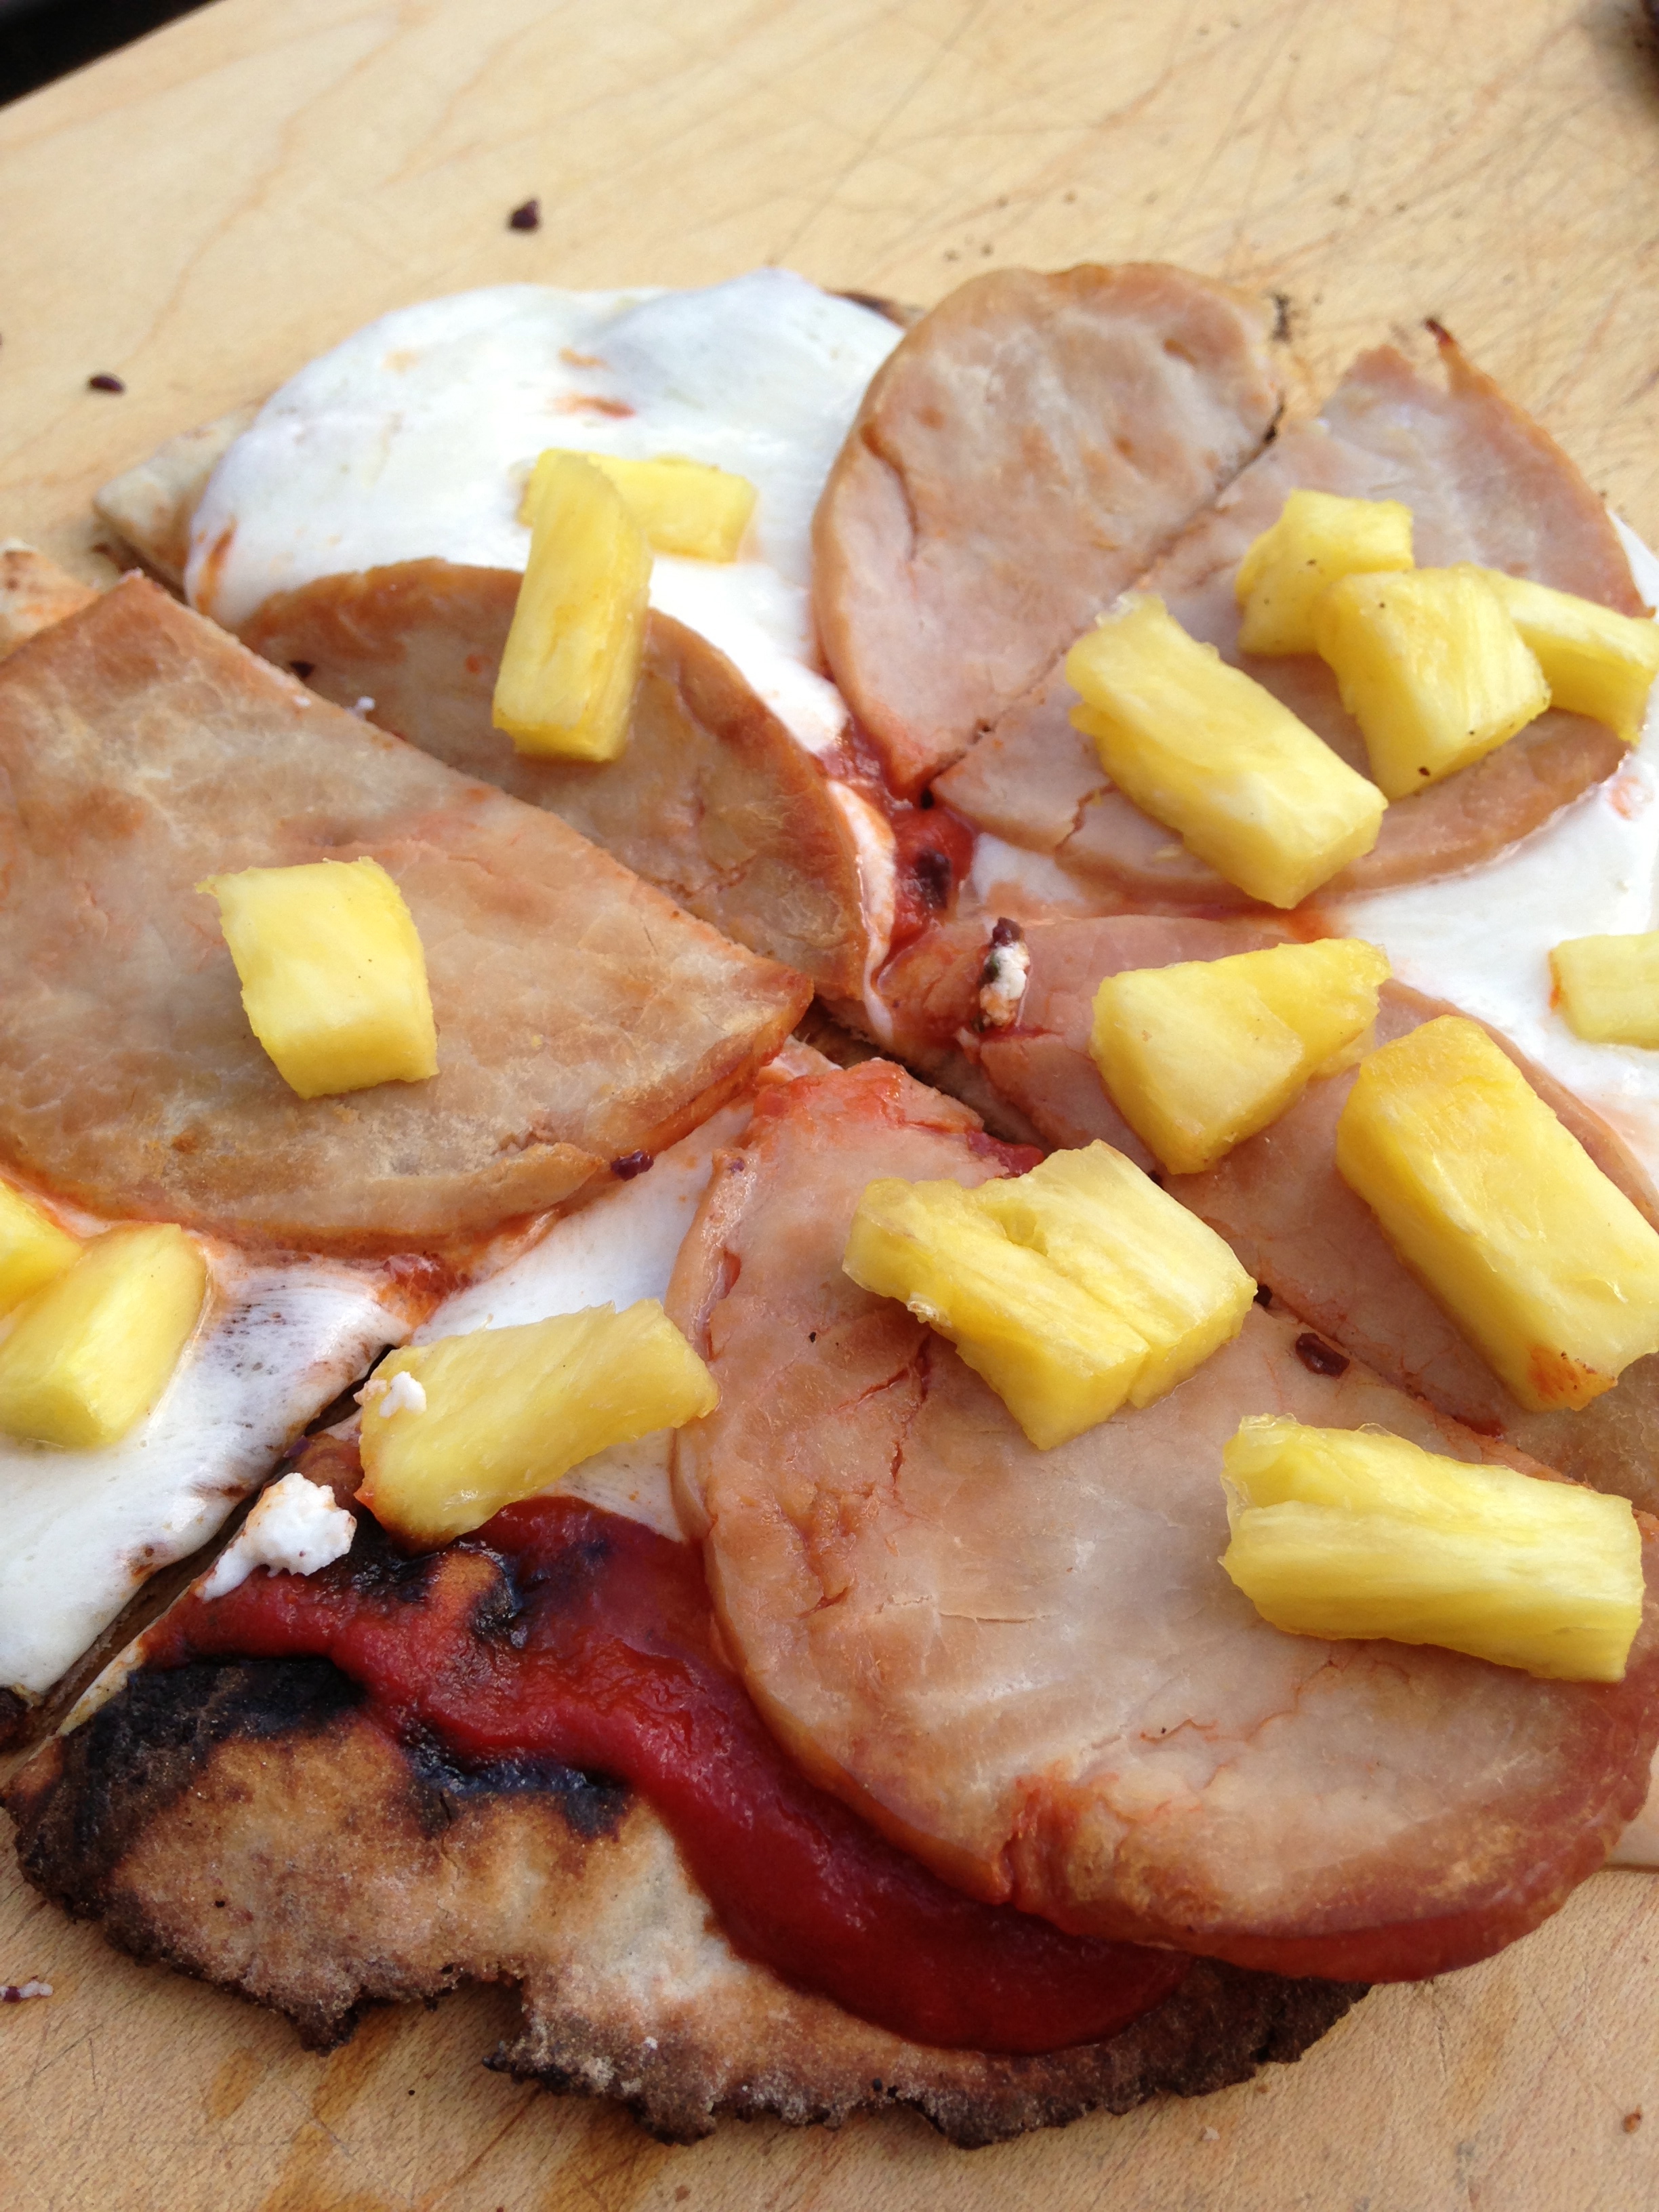
Traditional Hawaiian:

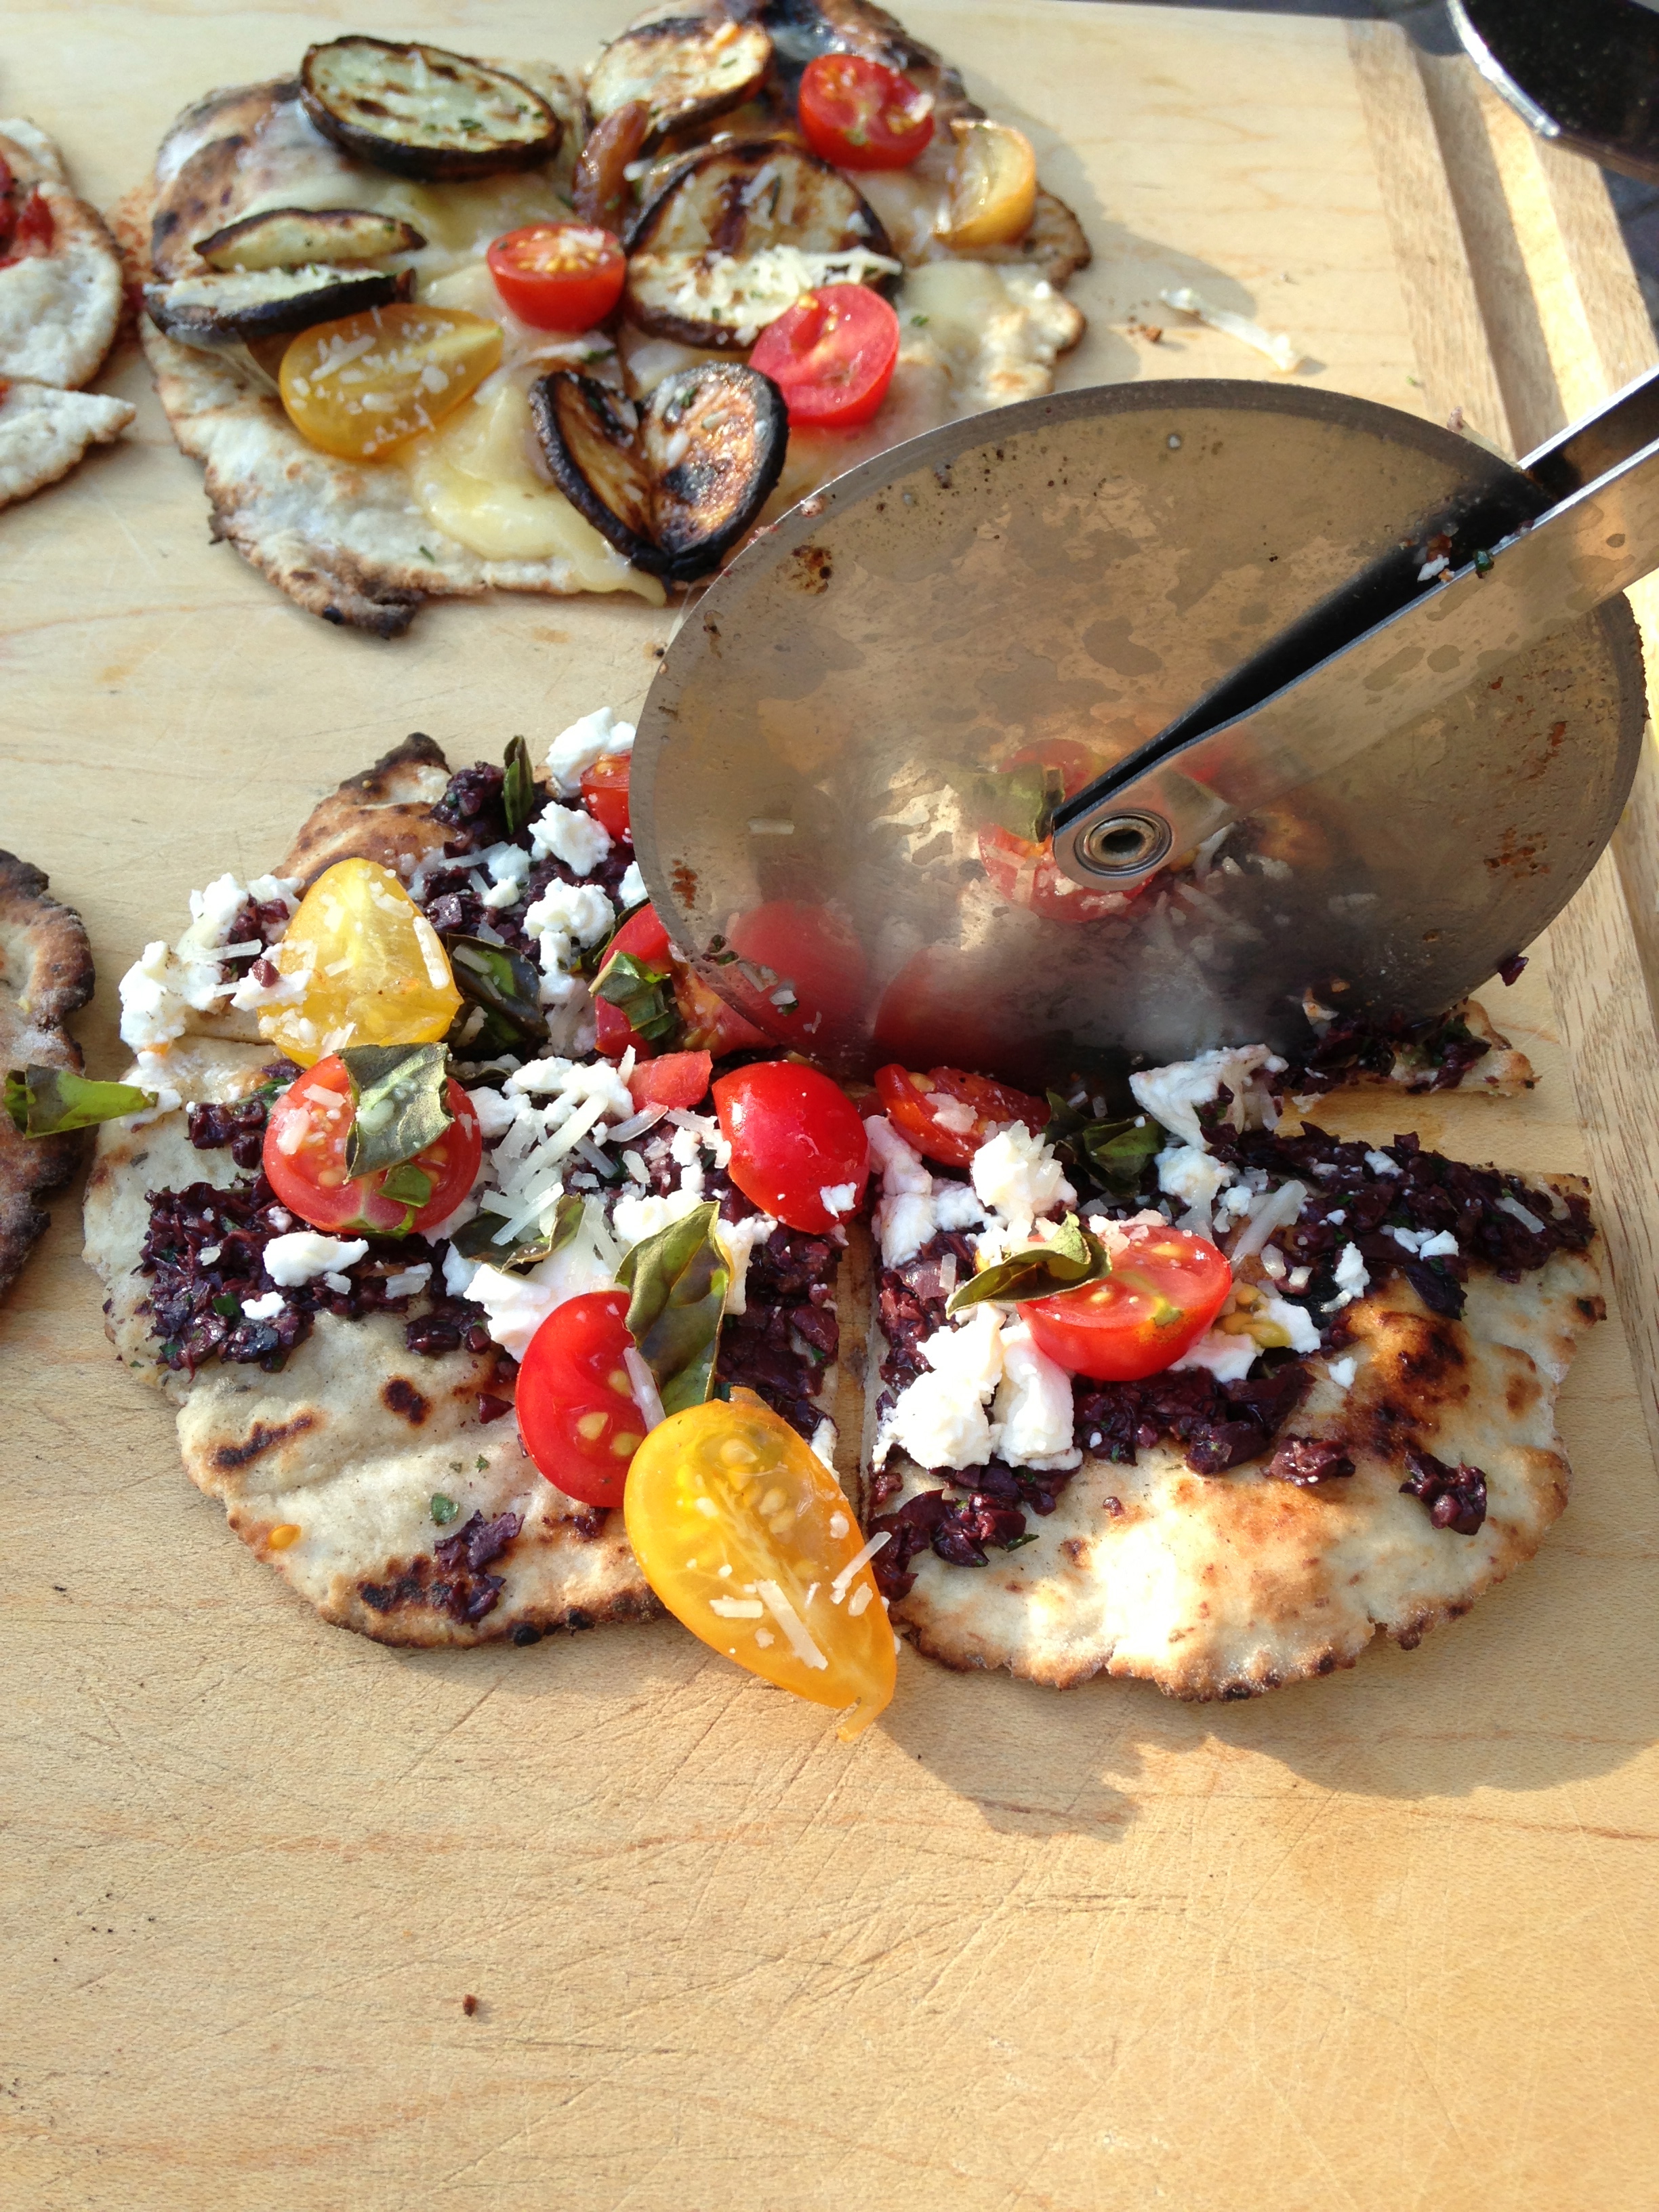
And Greek (Kalamata Olive Tapenade, Feta and Tomatoes from my garden):

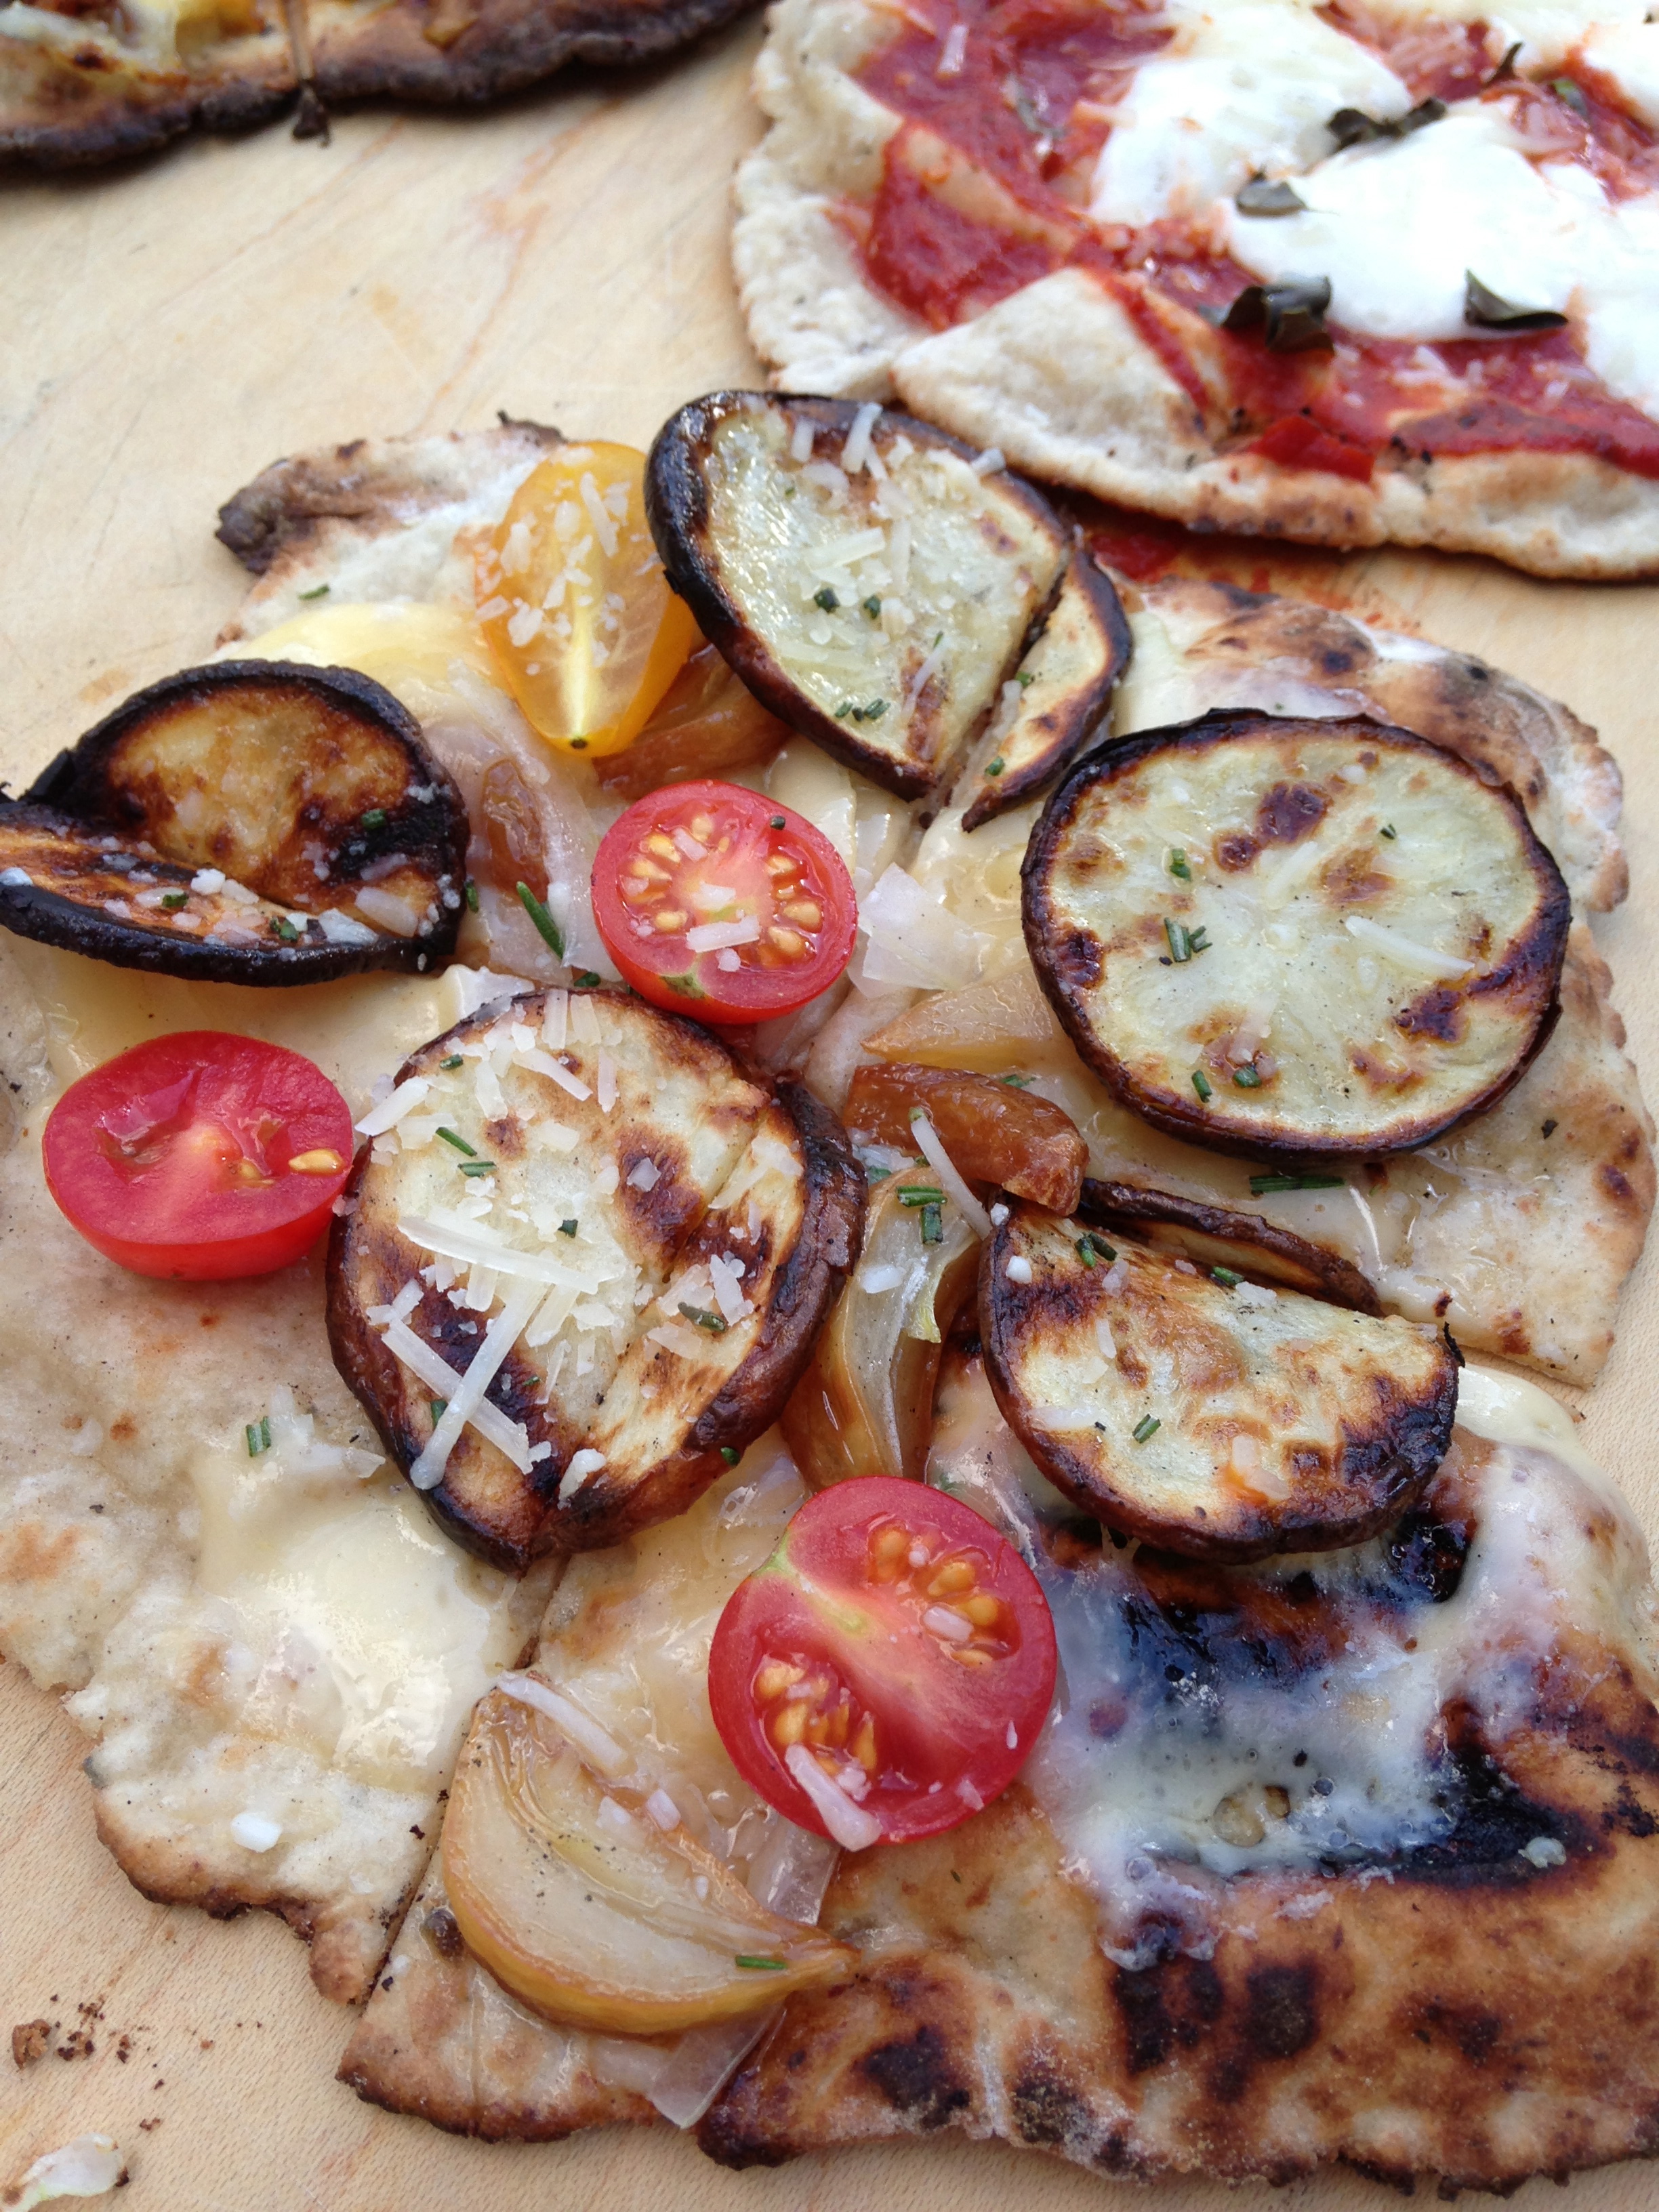
And lastly, Grilled Potato, Bacon, Tomato, Smoked Gouda and Roasted Garlic:

Notice that these are not the traditional uber-loaded American style pizza? Do not over load these, they are study enough to grill, but they will get soggy and break if the toppings applied with a heavy hand. We rather liked this thin crust ‘flat-bread’ style of pizza, and we most certainly loved the fun of creating, cooking and eating these outdoors, al fresco style. Can anything be better than communal cooking outside in beautiful weather, then the satisfaction of sitting back with friends and family to enjoy the fruits of your efforts?
PS) I provided links to some of the products I use. These are not paid advertisements, I just really like the product and like to share products and brands I enjoy and what I think works well.
PSS) I really recommend Pamela’s bread flour for this recipe. It has a bit of sugar in the flour, which helps the dough ‘caramelize’ like wheat flour would. I also realize the flour has xanthan gum in it already, but add the additional 2 tsp as stated in the recipe.