Gorgeously Gluten Free Yorkshire Pancake

Growing up my parents had a cabin in the mountains, and it seemed nearly every other weekend we’d make the 2 hour drive to spend those precious 2 days in the higher altitudes of the Cascade Mountain Range. I adored it. Winters meant lots of deep powder to ski on and great sledding. Summers meant riding our horses in the high dessert, soaking in the glory of God’s handiwork in the form of arid mountainous pines, alpine meadows, crystal clear running rivers, breathtakingly cold mountain lakes, and incredible mountain vistas. Whenever I reminisce my childhood it is chock full of those memories interlaced with the wonderful smells emanating out of my mothers kitchen. 

My love of cooking is an inheritance from my mother. Looking back I am amazed at the wonderful eats she churned out of that small cabin kitchen. My brother and I would leave the cabin after a hot breakfast, returning only when we were hungry, which repeatedly was not until dusk. In fact, it was so tough getting us in by dark that my mother hung a dinner bell on the back deck that she would ring when food was on the table, to which we would come running. Funny how kids are that way. Food is completely forgotten to the excitement of an ant colony, or a fish in the stream, meadows of shoulder high grass for hide and seek , or a rotted out tree trunk that needed to be explored for critter signs. But when that dinner bell rang, our stomachs let us know quite clearly we had not fed our engines all day! 

Yorkshire pancake is a dish that my mother made on a regular basis. She only ever made it at our cabin, I’m really not quite sure why. Was it the secret of the cast iron pan? Was it the mastering of having something puff so gloriously at a high altitude? Was it the simplicity of ingredients? Or was it that the cabin was a simple life and we were easily impressed by the sight of that mile-high puffed treat, showering her with praise. She is no longer with us, so I cannot ask her. I like to think it was a memory maker. A tradition unique to that time in our lives. All I know is how grateful I am to have that very same skillet in my possession, well seasoned by decades of use, non-stick smooth and black as night. 

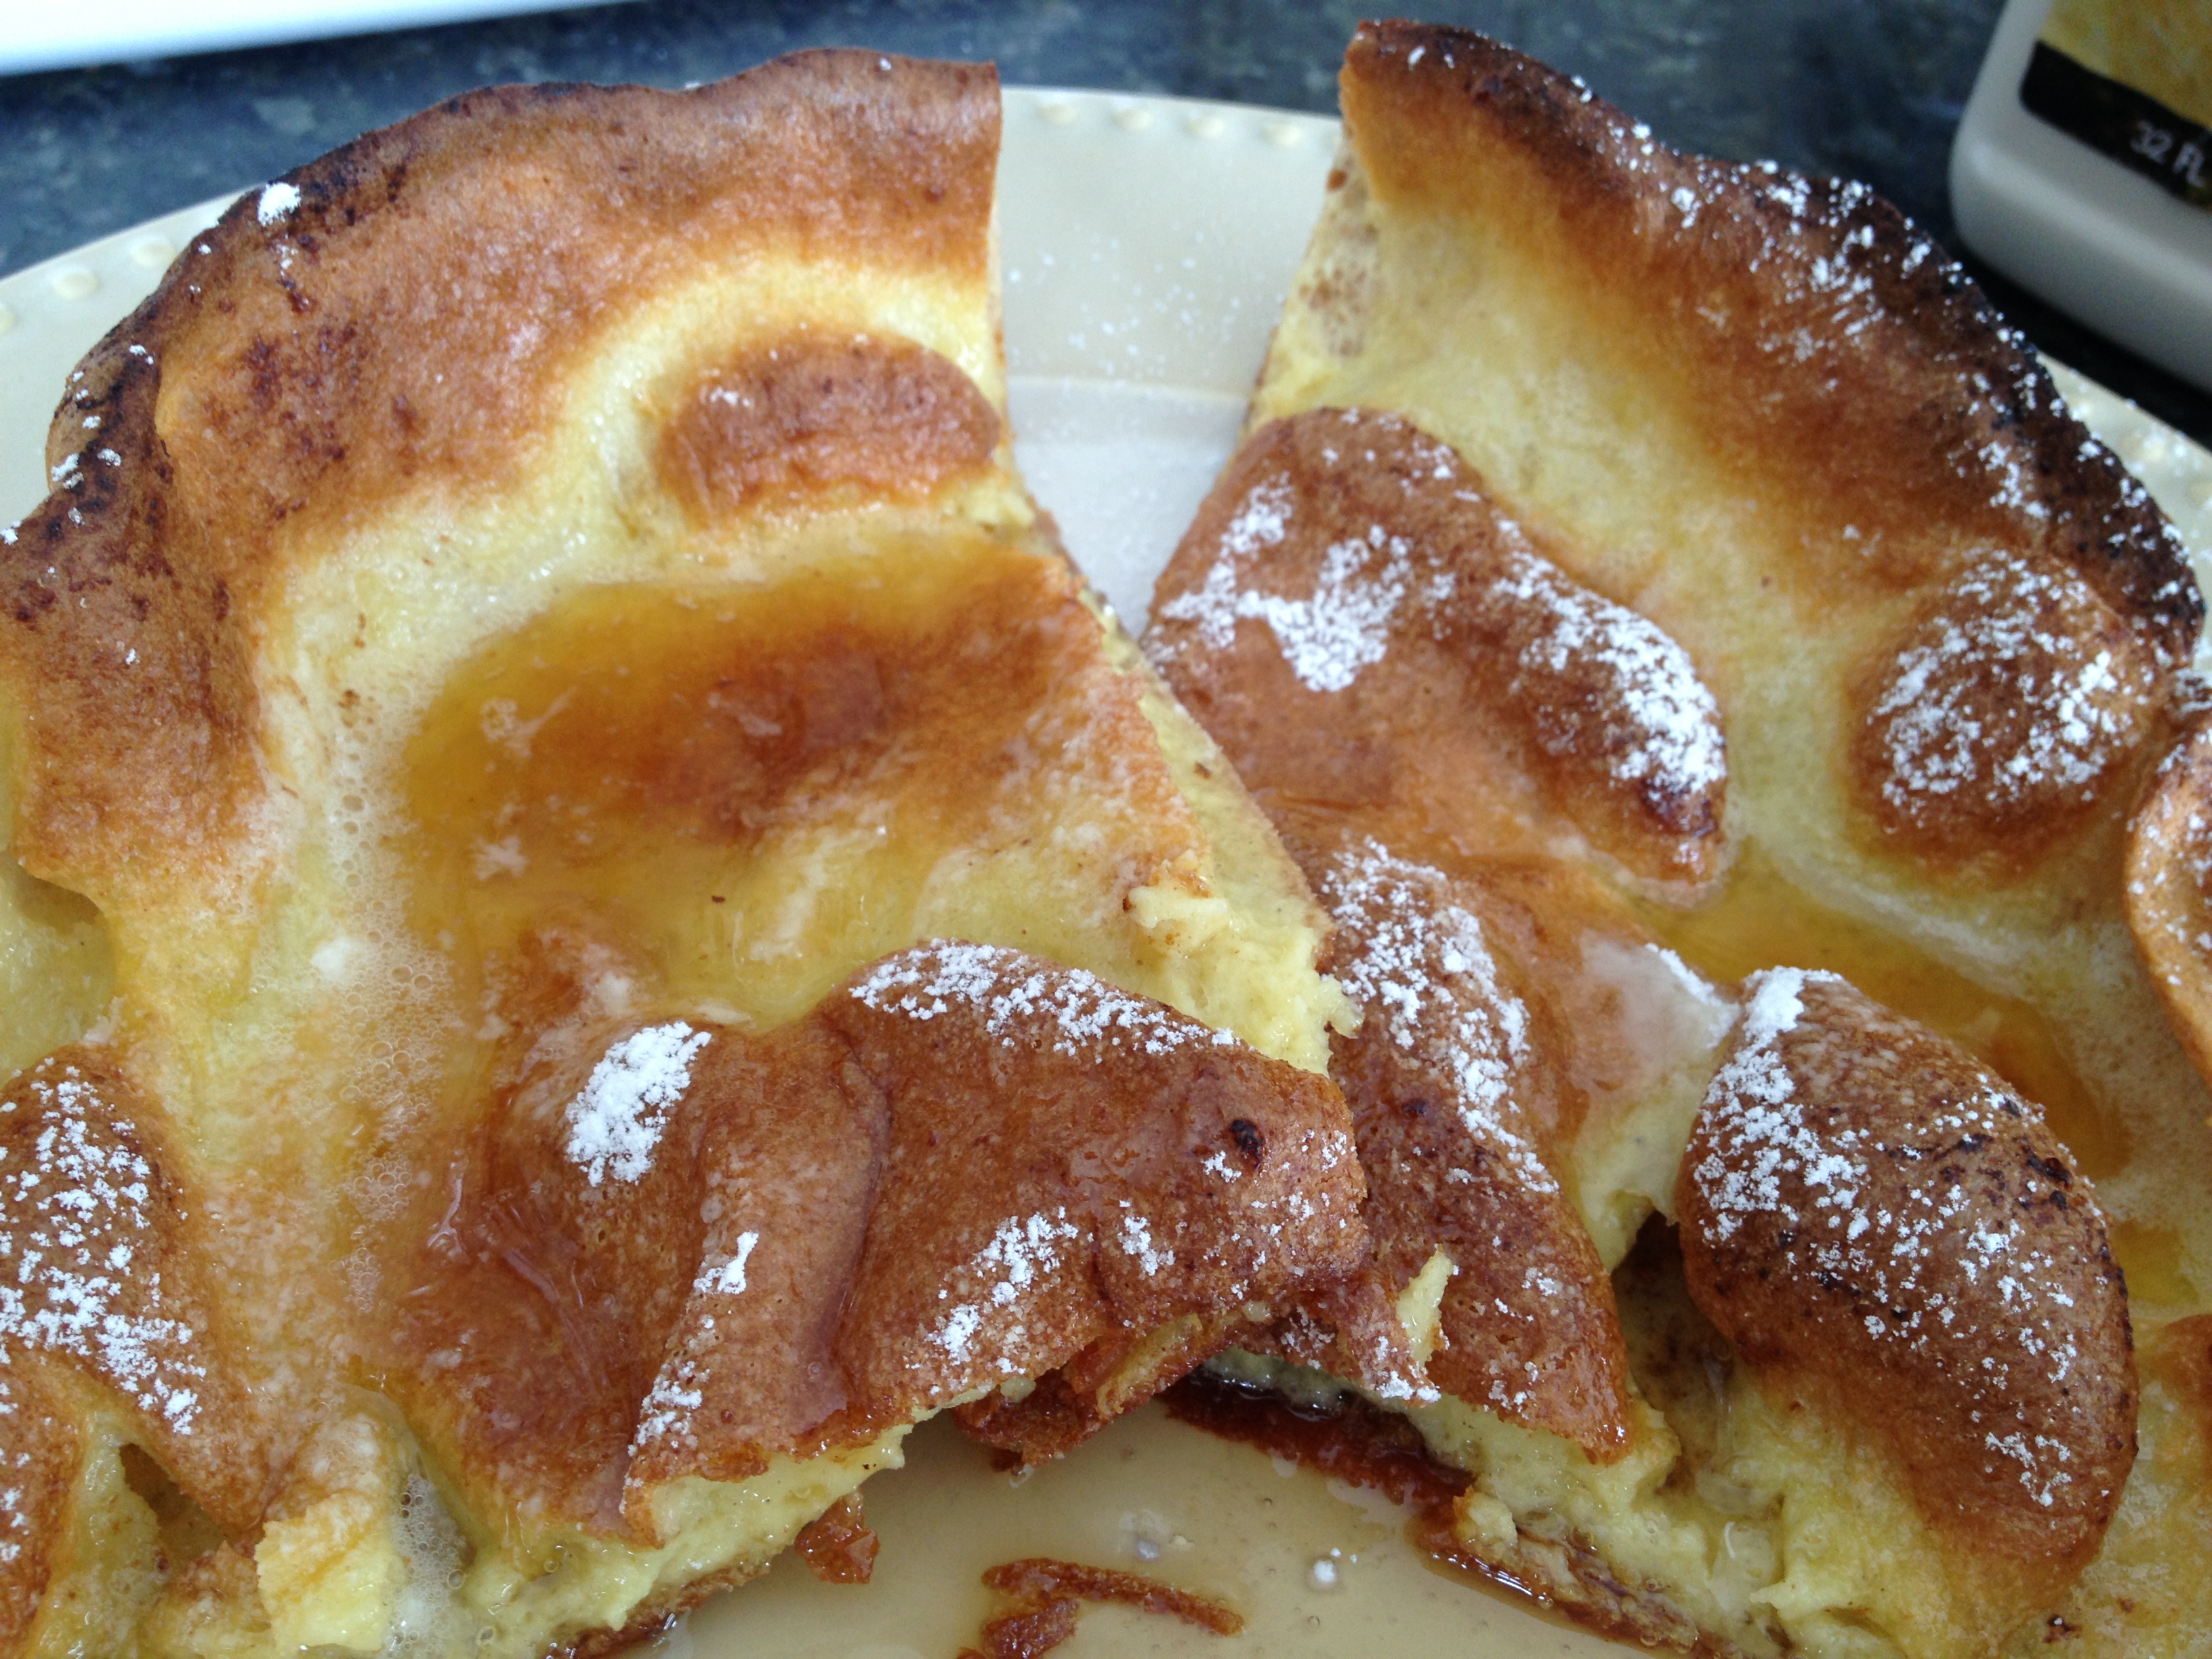
As the resident ‘memory maker’ in this family I have passed this tradition down. This has become a favorite of my girls that I bake on the long, cold, snowy winter weekends we have here. The original recipe is made with flour and if you are not GF, by all means make it with regular flour. It will produce results that will stun and wow any guest or family member. Just be sure to call the crowed BEFORE you pull it out of the oven. Like any popover/pudding batter, it will begin to deflate immediately, but as you can see from the photo below, should maintain it’s vertical edges beautifully browned bubbles. Made with my new favorite Pamelas Artisan Flour I get near identical results to my regular flour version. It doesn’t rise quite as high, but my daughter is tickled pink she can have her Yorkshire Pancake once again. 

A couple of tips for making this pancake:

Bake in a cast iron skillet. If you don’t have cast iron skillet use an oven proof heavy bottomed pan with low sides.

This recipe can be doubled. I’ve not had much success tripling it as GF, but with flour you can easily triple it to feed a crowd. I have adjust the butter compared to the original whopping 1/2c amount, and have tried to make it as low fat as possible without compromising taste. This recipe is not dairy free, but I cut down the lactose by using Lactose-Free milk. Pre-heat your oven while preparing, and whisk well prior to pouring in the pan for GF. For wheat flour, mix thoroughly and let rest while oven heat. 

Gluten Free Yorkshire Pancake

1/2 cup Pamelas Artisan Flour (I cannot recommend good results with any other flour. I’ve not had success with this recipe until I used this brand of GF all-purpose flour)

1/2 cup milk

2 eggs (whisked in to the milk)

1/4 c butter, melted (see recipe) 

pinch of salt. (I love to use my himalayan salt)

Preheat your oven to 425 degrees. Move the rack to the middle/lower rung of your oven (to allow for it to puff) and place your 10 in cast iron pan in the oven to heat up. (If your pan is not cast iron, heat on the stove top until very hot, but would NOT smoke oil) In a bowl whisk the eggs in to the milk  and add a pinch of salt. Add the flour and whisk in. There will be some lumps, let it rest for 5-10 minutes, then whisk out any remaining lumps. If using wheat flour, be careful not to over beat, as this will make the pancake tough. 

When the oven reaches temperature, CAREFULLY remove the hot pan to your stovetop. Add the butter and let melt. When completely melted, pour the batter in to the pan, and place in the oven. (I have found the GF flour can get a little thick, just make sure it’s spread to the edges)

Set your timer for 14 minutes and then check the cake. It should look set in the center, not raw. For the recipe amount above, I’ve found it to be done in between 14-16 mins. If I triple the recipe, I use a larger skillet (14inch) and let it go a full 18-20 mins. When it’s done, the edges will have puffed up and be crispy brown, the center will be soft like a pudding but not raw at all. 

This is so delicious served with real maple syrup and powdered sugar, a side of sausage links and a fried egg. I hope you enjoy it as much as we do. Let it be your memory maker! 

Image


Salt Brined Roasted Turkey

Salt Brined Roasted Turkey

Since I posted the photo of my Leftovers Soup, I thought it fitting to show the turkey meal from which it started. While I’m at it, I thought I’d share a couple of cooking ideas and tips I’ve learned along the way.

I favor organically grown, free-range, non-injected birds. I know they are a bit more in cost, but I can be sure there are no added hormones or pesticides to mess with my still maturing/developing daughters bodies and ensure the animals were raised and slaughtered ethically and humanely. As mentioned in a previous post ‘Todd & A Well Stocked Freezer‘, I get most of my meat from the local farmer who takes it to the local butcher. However, I don’t yet have a source for my poultry, so I look for the best I can find at my grocer.

When you bring home your bird, remove the neck bone from the cavity and the innards from the neck flap. (if you have them) Then gently slide your fingers under the skin of the breast, loosening it on both ends. Try not to rip or tear the skin. Then, take kosher salt, and lightly rub on the breast meat in between the flesh and the skin. This will give your fingers a good workout and yes, it will be a bit chilly. But take heart, while your digits shiver, your turkey meat will come out seasoned, tender and juicy. I can’t give you an exact amount of salt to use, just make sure you’re not slathering it on. You will want it LIGHTLY dispersed. Then give the skin and thighs a good liberal rubbing of the salt, place on a dish or platter and wrap in saran wrap. I put a clean kitchen wash cloth under the bird to absorb any juices that it might give off. You can also use a few paper towels, but I find those can get kind of slimy.

Then put in the fridge and let sit for a couple of days. This is ‘dry’ brining. It’s results are similar to wet brining- juicy flavorful and tender meat – but this method allows the skin to cook up and not be all flabby soggy.

After a couple of days, the process should be complete and you can cook that baby up. I use an air roaster oven because it frees up my regular oven for yummy dishes like this creamed spinach. I got the idea from Emeril over at the Food Network, but modified it a bit by adding parmesan and baking it after cooking on the stove top. It was just scrumptious.

While the turkey was cooking I boiled a combination of jersey sweet potatoes with red potatoes, along with a thinly sliced leek. Try this sometime: cook the onion with the potatoes, then drain and mash together, its delicious! You can ‘scent’ your liquid with herbs, garlic, shallots or leeks. For example, rosemary scented mashed potatoes is a delicious pairing with lamb.

To make the gravy, simply pour all the drippings from your turkey (i baste my bird with white wine, butter and sage, it adds a lot of flavor to the gravy) in to a fat separator, pour a few tablespoons of the rendered fat in to a saucepan. Add equal amounts of gluten free flour and cook it a bit to get the starchy taste out of the flour. I figure I need about 1tbsp of fat and flour for each cup of gravy. Then add back those yummy drippings along with enough chicken stock to make a gravy. If you have time, it’s nice to make a turkey stock from the neck & gizzards, but chicken stock works as well. The wonderful thing about brining your bird is that the drippings are naturally seasoned. You will need very little salt, if any. Adjust the seasoning, if need be. I added a healthy sprinkle of Penzeys “Mural of Flavor” to mine.

Also, another trick is to pour the gravy back in to the roasting pan, (or make it in the pan) and really scrape up to include those bits called ‘fond’. It will add depth to your gravy, or any pan sauce you make.

Dry Brining is excellent to use for any thick cuts of meat such as roasts. I used this technique on my Christmas Prime Rib Roast.

So say goodbye to blah and bland meat. Give this simple and yet effective technique a try. I think you’ll be very pleased when your family and friends say YUMMMMM.


Leftovers Soup: Turkey-Spinach-White Bean

Leftovers Soup: Turkey-Spinach-White Bean

I know it sounds odd, but it’s what I call it. Leftovers Soup is a yummy and easy way to use up those leftovers so they don’t go bad nor go to waste. This particular soup used up the turkey leg meat from a previously roasted turkey; Turkey stock, made from the bones of previously mentioned turkey; and a half of a Costco container of leftover baby spinach.

I also added onions, celery, carrots (which I always have on hand), a package of mushrooms (which were on sale at the grocery, I can always find a use for reduced price veggies!), and precooked white beans pulled from my freezer.
(When you have time cook up beans and portion the beans in 2cup measurements into quart ziploc bags and freeze. This way you can have the convenience of ‘ready to use’ beans at a far cheaper cost than canned)

For spices I used Alleppo pepper for a bit of spice (you can use red pepper flake), 2 packages of Goya ‘Sazon‘ (it gives the soup that lovely red color and adds a distinct puerto rican flavor-buy it and keep it on hand!), a good heavy handed shake of PenzeysMural of Flavor‘ and a bit of salt & pepper to taste.

I garnished with this soup with parmesan cheese. (Which I buy at the big box retailer and keep in the freezer. I then portion some in a small container to be kept in the fridge)

With leftover soup try to think of combinations that go well together. For example, turkey and mushrooms are a natural pairing. I have a book ‘The Flavor Bible‘ that helps me with ideal food combinations and pairings.

Layer flavor by browning or sweating your vegetables. Add chili pepper flakes to the oil while sauteeing to ‘bloom’ the flavor and temper the heat. Add durable spices (like bay leaf) to the liquid in the beginning of simmering, and add fresh (cilantro/parsley) or delicate spices (tarragon/marjoram) near the end or as a garnish. Add dark meats early to eek the flavor out of them, delicate/white flesh meats near the end. Frozen peas or corn are added at the end also, so they don’t overcook and get mushy.

If using raw lentils, add at the beginning, they take some time to cook. Cooked beans, however, add and simmer just long enough to heat through, otherwise they tend to break apart.

For more of a chowder style soup that is gluten free, make a “slurry” – cornstarch mixed with cold water/stock/milk – and add, cooking to thicken. You may also use arrowroot, but only for dairy free soups. Arrowroot + dairy = slime. Use about 1 tbsp of starch for every 1.5-2 cups of liquid.

Tomato paste really deepens in flavor if cooked with the veggies in the beginning with the oil. Add when the veggies are soft, just before you add the stock, cooking it a bit to take the rawness off. It adds a complex depth and dimension and a bit of thickness to the soup.

Save those meat bones! If you don’t have time to make a simple stock from your chicken or turkey dinner, put them in a ziploc freezer bag and freeze them until you do have time. No need for defrosting, just plop them in with carrots, celery and onions, and simmer and let reduce. The stock can then be used or frozen for future use. As my grandmother taught me: waste not, want not. Use your homemade stocks as one of the layers of flavor foundation for your soup.

Depending upon my mood, what is in the fridge and what I have on hand, I save myself money, prevent food waste and feed my family food that I know is healthy and good for them.

As a side benefit, I always have a little leftover for hubby to take to work for lunch the next day, or an afternoon snack for a hungry child going returning from school and headed out to their athletic activities.

I hope this inspires you to look at those leftovers in a new fresh way: Transform turkey, mashed potatoes, and corn in to a chowder. Cubed leftover meatloaf can be the beginnings of a riff on Italian Wedding soup. Left over beets can be morphed in to a kicked up Borscht topped with healthy greek yogurt garnish. Leftover lamb makes a fantastic ‘curry’ with chickpeas and canned tomatoes.

The possibilities are endless!