Savory Sweet Potato Mash, Gluten-free, Dairy-free


IMG_1443D

I’m not gonna lie, I don’t much care for sweet potatoes.
I know, I know, everyone has told me I should eat them because they are good for me, but my experience with them has been cloyingly sweet, or chili-pepper hot, deep-fried with heavy dipping sauces, neither are my favorite.
To be honest, once in awhile I’ll bake one and stuff it with chorizo, butter, cotija and cilantro, but with the dairy-intolerant in the crowd I have to save that option for days they are not visiting.

It was family dinner nite and I was racking my brain on what to do with my 6 Jersey Sweets on hand. (They are the ONLY ‘sweet’ potato I tolerate, primarily because they are not that sweet.)
As I rolled things around the savory/dairy-free conundrum in my head, it dawned on me: instead of butter (or fake butters) what if I used an infused oil instead?

Ah HA! (pat myself on the back!)

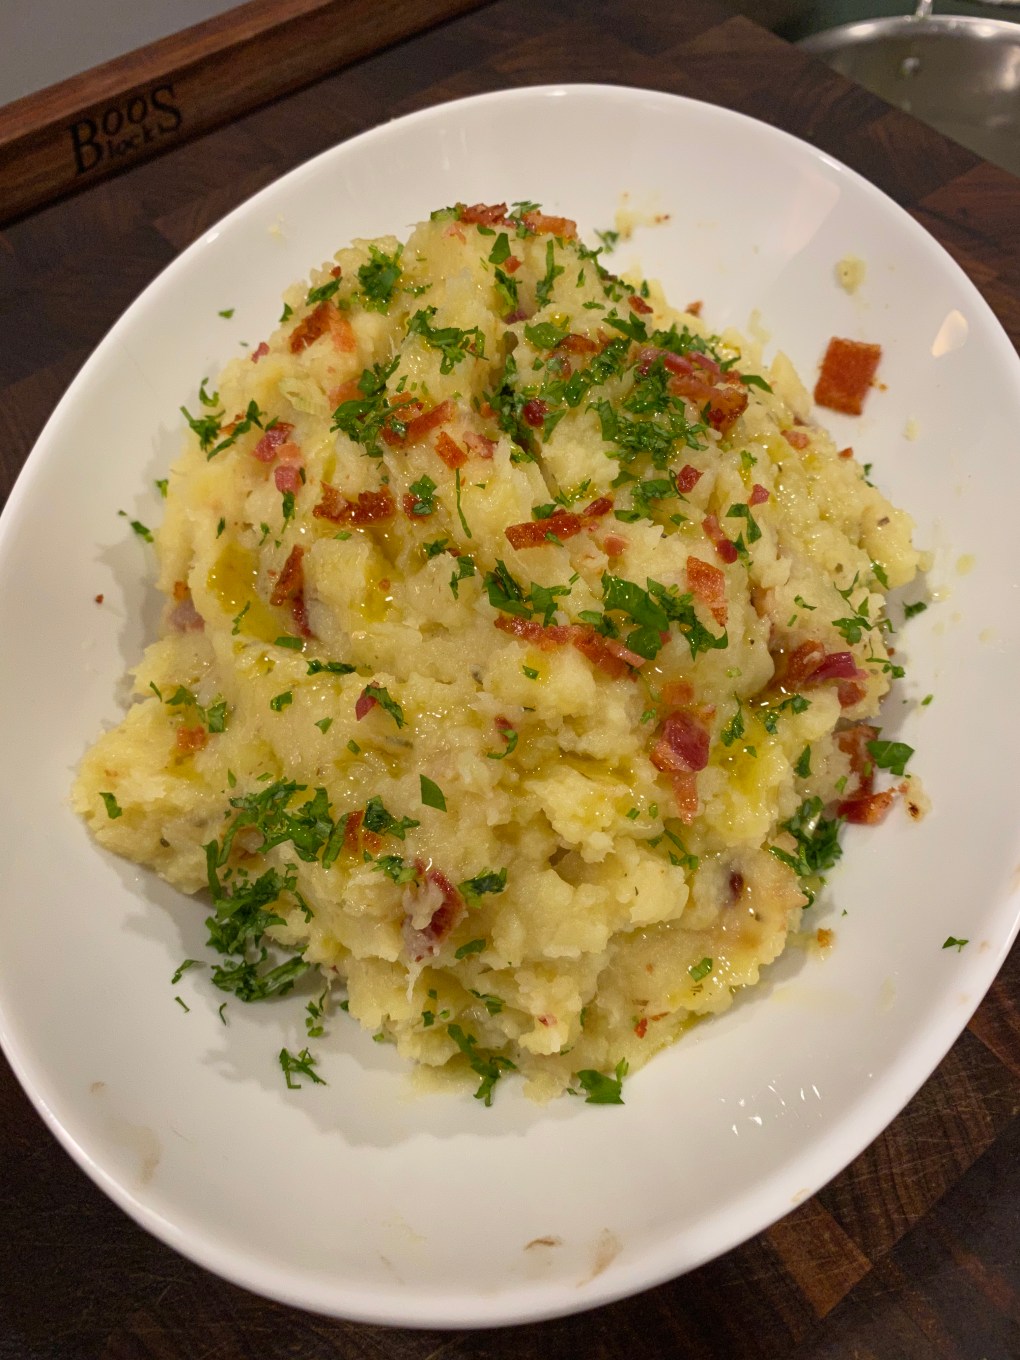
This is what I came up with: Herbs de Provence & garlic scented, sage infused olive oil (a good tasting one), along with bacon, chives and garnished with parsley. For those who feel the need to ‘brighten’ up the flavors you could add a squeeze of lime, but I LOVED the way they turned out. So did the rest of the family!

***Note: I do not recommend any other ‘sweet’ potato for this recipe. Jersey Sweets (they are light brown in color and can vary in shape and size) are ideal because of their lower sugar content and earthy flavor.

Savory Sweet Potato Mash, Gluten-free Dairy-free
(serves 6)

6 medium sized Jersey Sweet Potatoes (approx 6-8 inches long), peeled and cut into equal sized chunks
2 cloves Garlic, peeled & whole
1 generous palmful of Herbs de Provence
1/3 C Olive Oil, good tasting-like an EVOO (extra virgin olive oil)
Sage, leaves from 2 sprigs
2 Green Chives, white & light green part only
6 slices Bacon, cooked and crumbled, 1-2 slices reserved for garnish
Parsley, minced for garnish
Kosher Salt & Pepper

Peel and chunk the potatoes, adding them to a pot of cold water to cover by a couple of inches. Add the garlic cloves and Herbs de Provence, and a good generous palmful of kosher salt  then bring to a simmer. Cook potatoes until a fork can easily pierce them.

While the potatoes are cooking, in a small saute pan add the oil and sage leaves. Turn on low heat and allow to come to a simmer.  Simmer the leaves (it looks like they are frying) for a minute. You are aiming to get them to release their oils, not brown them, but they will change color and texture.
Turn off heat and let leaves continue to perfume the oil while the potatoes cook. Reserve a generous tablespoon or two of the oil for garnish.

When the potatoes are tender, drain.
Put hot potatoes (including the boiled garlic cloves) back into the pot on the – now turned off but still hot – burner to let the excess water in the potatoes steam off and dry out a bit.
Using a potato masher or a fork, mash the potatoes and garlic in the still hot pot. You really want to render some of that excess water out. You can turn the burner on very very low for a few minutes to assist, adding some of the sage infused olive oil to keep from sticking.
Add 3/4 of the olive oil to the potatoes, reserving some to spoon over the top at serving.
Mix in the chives, bacon and stir to combine.

Pile potatoes into a warmed bowl, garnish with bacon bits, parsley and drizzle the extra oil over the top.

I hope you enjoy this as much as my family did, its a real keeper! You could add a DF/Vegan cheese if you wanted, or change up the herb to infuse in the olive oil.
Personally, I think they were perfect the way they were, and paired extremely well with a roasted pork tenderloin but they will go well with roasted chicken or steak.
If you are vegan or vegetarian, this would work without the bacon.

ENJOY and let me know what you think!
(Check out the photo below, glistening with that drizzled sage-y flavorful olive oil!!)

IMG_1444D


Incredible Dairy Free Caramel Sauce!

Well, I must say there are times I’m pretty happy with the results of my experimentation, and this is one!

To start with:
My husband and I have had a wee bit of life changes since my last post. My oldest daughter wrote and produced her first EP album (check her music out: Here), moved to Denver and became an interior designer. My youngest graduated college, fledged the nest and is now working in the computer coding field.
Both are totally ‘rockin’ adulting.
In July hubby and I celebrated our 30th anniversary with a 12 day trip cruise along the Alaska inner passage. We lived in a teeny tiny space w/ 1 suitcase of clothing for 12 days. It was a bit of a revelation for me that I could happily live in a small space with so little, for an extended period of time. (Don’t judge me if you are already a minimalist, I have lived in our home for 20 yrs!)

Liberating actually.

With a fresh mental frame of reference, returning back home to a beast of a house and yard, I had the itch for change, and a desire to have the freedom to pick up and GO! Also, hubster has been bearing the brunt of a horrific commute from our little sleepy suburb into the city. While that commute has increasingly become unbearable for him, I won’t lie, I was terrified of change. However, the wonderful house I enjoyed raising my daughters in and entertaining many friend with now felt like a giant burden of maintenance and work.
With that mental ‘shift’, I proceeded to spend the next 3 months purging and prepping the house for sale. Fortunately my husband travels often, because it was a whirlwind and I was a crazed woman on a mission.
In the process I discovered WOW! We have accumulated a whole lot of CRAP in 20 years!

We had a buyer straight away with a request for a (less than) 30 day closing. We agreed and made arrangements to put the bulk of our stuff in storage and move into an apartment until we could decided what we wanted to do.

So Now:
Here I am. In an apartment. It’s just me, hubby, and our two furry kids.

It is a teeny tiny space, so I have very little to clean and maintain, best of all…no yard! With so much time freed up, I have the the luxury to reacquaint myself with the things I used to love, but became yet another chore: cooking and baking.
Our unit has a tiny but efficient kitchen with a gas stove. The layout is the perfect cooking triangle and with a step stool always at hand to reach the very high cupboards, I’m learning to make use of the most basic of equipment and tools to craft meals.

Hubby took off this weekend for a boys outing, so I invited my daughter to come and have a sleepover.
We went to the local apple orchard and got fresh baking and eating apples. We stopped at the store to get ingredients for a GF/DF Pizza as well as to make an apple crisp. While we were waiting for the crisp to bake and the pizza dough to rise, I made her a ‘snack’ of honey crisp apple slices and yes….a dairy free caramel sauce!

I was skeptical that I could make it work, but wow! I was so pleased! It was really, really, REALLY good!
I’ve always loved Nigella Lawsons Sticky Toffee Sauce from a decade ago. Its super easy and hard to mess up, but it is made with butter and cream.  I used her recipe as a platform to springboard off of for my DF caramel sauce.
I’ve raved about the Miyokos Vegan Butter in previous posts, but let me tell ya, if you can tolerate cashews its’ a real game changer! It is a worthy substitute for the butter. Dairy cream was replaced by coconut cream and no, I don’t mean the stuff from a carton. I mean the firm layer of solidified coconut that comes from a can of coconut cream. (Do not use the liquid at the bottom, nor stir it together, only use the solid ‘cream’.)
My daughter in the photo is dipping while it was still warm. It thickened up properly after it sat for a good hour.

Give it a whirl and let me know what you think. I think I’ve struck gold on this one, and I will be using it on homemade GF/DF cinnamon rolls, ice ‘cream’, and in our caramel apple cider in the future.

Dairy Free Sticky Toffee Sauce

3 tbsp brown sugar
2 tbsp white sugar
1/2 c Lyles Golden Syrup (there is no substituting this, but it is now easy to find)
2 tbsp Miyokos Vegan Butter
1/2 C coconut cream (the solids from the can, not the liquid, see notes in post above)
splash of vanilla

Melt the sugar, syrup and ‘butter’ in a saucepan over medium heat. Bring it to a boil and let it bubble for 3-5 min. Keep an eye on it so it doesn’t burn.
Add the cream and vanilla, remove from heat and stir until combined.
It will thicken as it cools.

Leave a comment below and let me know what you think!
(And don’t forget to check out my daughters music – Here!)


Domestic Goddess Cooking Tip – Turkey Stock-Recipe Included (2019 Updates!)

IMG_3747

Are you making Thanksgiving for a crowd, want a turkey stock that makes enough for your stuffing (see Netties Stuffing) and a boat load of gravy?

Domestic Goddess Tip of the Day: Clip the tips off the wings, leaving the drummie and meaty finger.

You can also add saved up chicken necks or chicken wings to your stock to ‘Oomph’ up the flavor. I always cook the Neck, Gizzards and Heart in the stock, (But do NOT add the Liver. Cook your liver separate in a small skillet with a little butter, then dice it up and add back to the gravy, along with the neck meat, diced heart and gizzard. Cooking the liver in the stock can impart a bitter taste. Trust me, it’s quite delicious and a great way to get the fam to eat organ meats)
The flavor that resides in the poultry fat is water soluble. So, by adding the fatty wings, you pull out the flavor and can then skim & throw away the fat.

(2019 Update) Over the past couple of years, I have increasingly seen my meat departments carry packages of necks, wings and gizzards BEFORE the holiday! It’s so totally awesome! Now, I head out to the grocery a week in advance (you can freeze the stock, so you could make it a month in advance if you can find the meats)
For this batch I now use 3 quarts water, add 2 necks, 2-4 wings, back bone (if included), and the gizzards (not liver). Using the added meats really increases the collagen and richness of the stock, I highly recommend to ‘go big’ and make a full stock pot of stock, then you have stock for your dressing, gravy and soup the next day.
Then again, you may want just enough for the big meal itself. Its a flexible recipe, add a bit more or less of the herbs depending on your tastes. I now add a couple palm fulls of herbs de provence and strain the stock after cooking, squeezing as much goodness out of those bones.

Here is my ‘go-to’ flexible recipe for Turkey Stock:
3 quarts of water
3-4 large Carrots, rough chopped
3-4 Stalks of Celery, rough chopped
1 Large (or 2 medium) Onions, rough chopped
1/2 a bunch of Parsley (the stocks of parsley are a great way to pinch a penny and use something people usually throw-away)
2-3 sprigs of Fresh Sage (or 1 tbsp dried)
2-3 sprigs of Fresh Thyme (or 1 tbsp dried)
Turkey Neck, heart, giblets and wing tips or whole wings, don’t forget the tail is good to clip and use in your stock also.
whole peppercorns

Let it simmer, lid off for at least an hour, maybe 2. I usually end up with about 8 cups of stock. If you do this the day before (like I do) while your turkey is brining overnight, strain and store overnight in the fridge.

(2019 Update) I make this now about 5 days in advance. When cold, the fat will rise to the top and is easy to peel off. This stock makes a gravy your family and friends will rave about…so make sure you make a big batch!

Rarely does anyone eat the the wing, while the cartilage and fat add a lot of flavor. So try this little trick of mine!

IMG_3751