Perfectly ‘Creamy’ Perfect Dairy Free, Gluten Free Pea Salad

IMG_5288

My daughter and I recently attended an IF Table Event. If you have never heard of IF, you are not alone. I hadn’t either. Well, correction, I had HEARD of it, I’d just never thought of going. My daughter however, wanted to go and it was a perfect opportunity to not only do something together, but do it together in faith. IF Table is where women gather to share food, fellowship and faith. An introductory story or theme sets the stage, with questions posed for the group to share personal perspective on. It may sound corny but it can actually be quite cool. If (yes, a little pun intended) you have the opportunity to attend one, I recommend it.

With that ‘table set’ (yes, I did it again, LOL) I wanted to bring a couple of dishes that my daughter could eat, if there was nothing else available. (Watch for my super simple asian glass noodle shrimp salad recipe to be posted next)
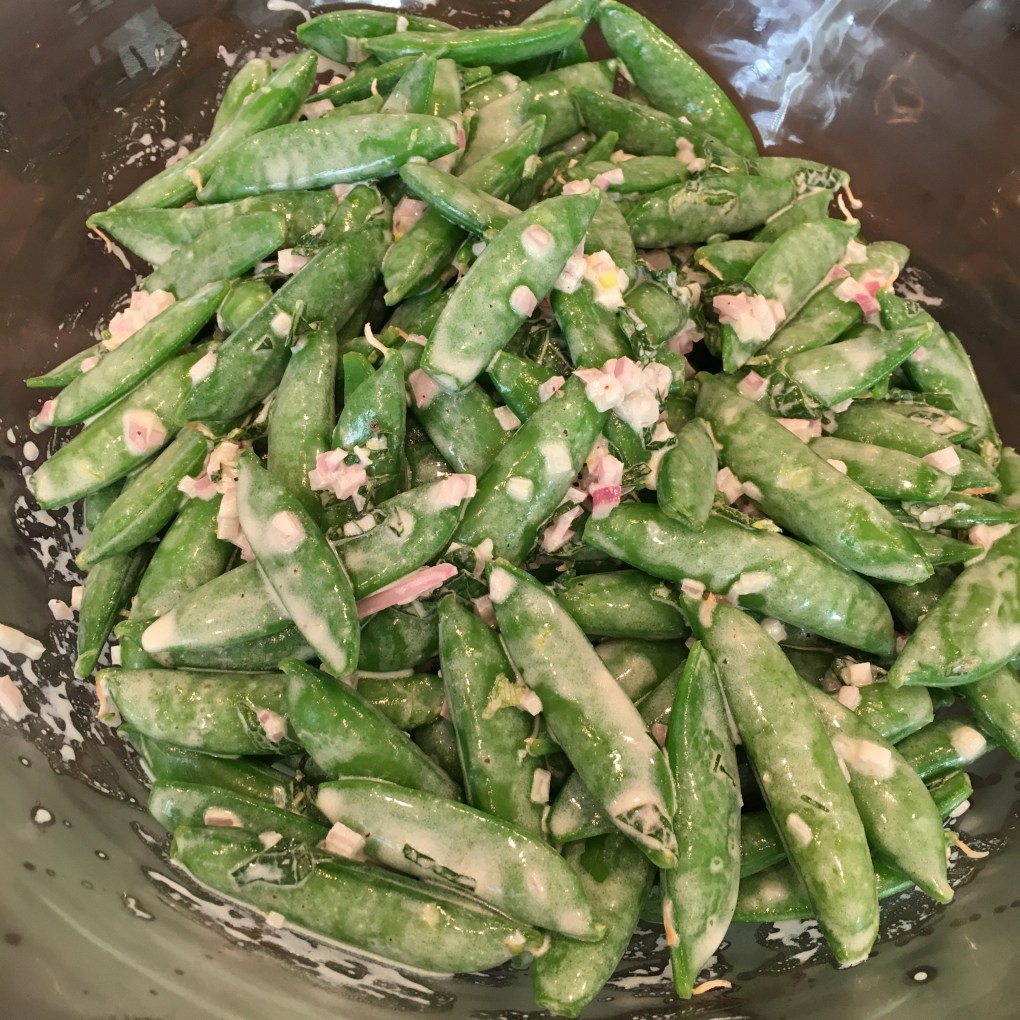
I decided, with the blush of spring finally upon us, to make a perfectly creamy pea salad w/o the dairy. This was such a hit with the ladies, I’m sharing it here. I’m really glad I chose this because surprisingly, in the group of 18 women, sitting at my table were 2 others who were not only gluten free, but dairy free also! What are the odds? Well, there are no coincidences in the life of a christian, so there you go!
This salad is a snap (I just cant seem to get enough of wordplays!) to put together, and is easy to make to feed a crowd, or just your family. (If its just 1 or 2 of you, make just 1 bag of peas and adjust the other ingredients to taste)
Its also flexible. If you have fresh basil, parsley or even cilantro on hand, use that. If you want to make it more hearty, add a chopped hard boiled egg, ham or bacon. Fresh farmers market tomato, diced, would be yummy too.
Since we are flush into spring greens here in MN, this is a great way to take advantage of all the fresh produce, and get your healthy veggies in!
Enjoy!

Perfectly Creamy Pea Salad (dairy free & gluten free)

*Serves 4 generously as a side
*double this to make for a potluck or larger gathering.

2 bags Stringless SugarSnap Peas (or approx 1 lb total)
1 medium shallot (about 1.5 tsp) diced fine
1/4 c *Silk Plain Almond Yogurt (see notes below)
1 tbsp Mayonaise
2 tbsp Extra Virgin Olive Oil
8-10 Leaves fresh Mint, chopped fine (I julienned)
1/2 Lemon, zested and juiced.
Salt and Pepper to taste

In a 4qt saucepan, set 2 quarts of water on the stove to boil. Prepare an ice bath: large bowl with ice and a small amount of water next to the stove.
Salt the boiling water, and add 1 bag at a time to the water. Allow to cook 1-2 minutes, just long enough to set the color. You are not cooking, but merely blanching the peas. They will retain their textural crunchiness, but take on a vivid green color.
Immediately remove, using a spider ladle (see example here) and dump the peas into the ice water bath to stop the cooking. Repeat with the second bag of peas.
Remove the peas to a dry, clean tea towel and pat dry.
In a medium bowl, combine the rest of the ingredients, and then toss with the peas.
Salt and Pepper to taste.
Transfer to decorative serving container if desired. (I prefer lightweight plastic when I take to potlucks. Its easier to carry something light.

Note:
Because you shock the peas in ice cold water, this dish is ready to serve right away, awfully convenient when the opportunity to a last minute potluck invitation arises!
*I just started using DF plain yogurts. I know there are a growing number of brands of plain yogurts now on the market, just be sure there is no added sugar. You do not have to use Silk brand, that is what I used.


Best DairyFree ‘Butter’ EVAH!

IMG_5283

Since my daughter had to go dairy free as well as gluten free, my life has been in a conundrum. I love to cook, and the main tools in my cooking arsenal are olive oil, avocado oil and butter. Olive oil and avocado oil can substitute well in a lot of places, but there just doesn’t exist a good substitute for dairy.
I’ve experimented with various ‘vegan’ products and while they are getting better, many are just not there….until now!

This vegan butter is seriously a game changer for me, and my resistance to compromise on taste and quality. I simply hate having to settle for producing an inferior product, just to be able to have it. My daughter has tried enough mediocre GF/DF products to agree with me.

Enter Miyoko’s Creamery European Style Cultured VEGANButter. This product has changed my attitude (did i say that out loud?) about non-dairy cooking.

My first foray into testing was grilled sandwiches. Personally, as a super-sniffer I find most ‘vegan’ butters to be at best, meh. Sure, they are adequate when spread on something, but cooked/melted they take on a rancid smell.
IMHO.
(I believe this to be due to the fact that vegetable oil is processed at such a high heat to extract, that it is actually made sorta rancid. Of course, the processors then have to ‘bleach’ the smell out to make it palatable to consume. Well, I can smell it. Ick.)
This ‘butter’ performed like a charm. The toast was browned (a big complaint of non-dairy products), crunchy, and had the real creamy – smooth taste of butter. Pancakes performed just as well. Eggs need a touch of olive oil to keep from sticking, but I find that to be an issue with real butter also – due to the solids. The taste? Buttery.

Seriously…can I emphasize again: TASTES. LIKE. BUTTER.

Granted, this is european style cultured butter, with a smidge of that cultured tang, certainly not a negative in my book.

Since I’ve started using this product around Easter, I decided to try an egg bake.  I tested this in a GF cinnamon raisin bread, ‘French Toast’ style egg bake. I used this ‘butter’ mixed with brown sugar, sliced almonds and a bit of GF flour for the topping. While it did not hold up in a typical style crumble, (maybe next time I’ll use some oats) it did melt and created a nice crunchy caramelized top to the bread-y eggy concoction. I need to research the science to figure out how to keep the topping more texturally firm, but it was SOOOOOO GOOD!
And baked potatoes? Oh yeah. Slather it on.

I’m looking forward to testing out some of my daughters favorite sweets and treats using this product. I can’t wait to make ‘butter’-cream frosting and a butter cake.

I’ll keep you posted, so keep checking back. This one is definitely going to be a pantry item for me.


Naturally Gluten Free Cornbread

img_7493

Welcome to fall! With the autumn crispness in the air, chili in many forms, becomes a regular on my dinner table. We love turkey chili, beef chili, vegetarian chili. We love it mild or light-your-head-on-fire hot. My favorite side dish for chili is cornbread.

I’ve tried many cornbreads, and I’ve found far too many that are dry and dusty, or the flavor of corn is masked by other ingredients. I really like corn to be the star of cornbread. I also need it to be gluten free…and low in the dairy protein. My kids are gluten intolerant and my youngest is having issues with dairy and dairy protein. Interestingly, it seems butter can be considered ‘dairy free’ because it is a fat and the amount of protein in it is fairly minimal, especially ghee. And my daughter (thankfully) can manage butter.
I haven’t made this with anything other than butter, but I imagine you can substitute a butter flavored shortening if you must be 100% dairy free.
This is my mothers recipe, and I can remember her baking it in a cast iron pan at our mountain cabin. My brother and I would come in from being outside in the clean mountain air with a ravenous appetite, and my mother would pull this hot out of the oven for us to gobble up. I really hope you enjoy it as much as we do in my house. Its moist, buttery, tender, and bursting with corn flavor.

As always, read through the entire recipe before starting, and if you have questions, feel free to leave them in the comment section.

Moms Naturally Gluten Free Cornbread

6 Tbsp of Butter, softened
2 Eggs
1/2 Cup sugar
1/2 Cup Cottage Cheese (I use 1%)
1/2 Tsp Salt
1 Can Creamed Corn
1 Cup Corn Meal. (I use Bobs Red Mill)
1 Tsp Baking Powder, mixed with a little milk or milk substitute just before adding.

Preheat oven to 375 degrees.
1. Cream butter and sugar together using a stand mixer or electric mixer.
2. Add eggs, beating between each egg addition. This will look loose, but don’t worry about it.
3. Add cottage cheese, salt and creamed corn. Stir to combine.
4. Add cornmeal, mix until well blended.
5. Mix baking powder with a little milk  or dairy-free milk substitute, if needed. Add to the batter and stir to combine.
6. Pour batter into a greased or buttered baking dish 8×8 or small casserole of equivalent volume, (see photo below), or use a 10 inch cast iron pan like my mother used.
7. Bake for 45 minutes, rotating pan halfway through. Use a toothpick to test for doneness. Let cool 10 minutes before serving.
This bread is very moist, use a small spatula to remove cut pieces.

ENJOY!

img_7490

(This small casserole is 10 x 6.5)